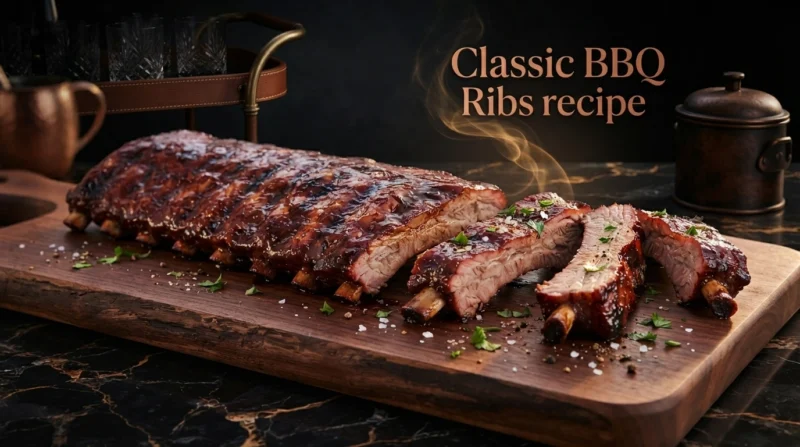
Classic BBQ Ribs Recipe
There are few barbecue dishes more satisfying than a rack of ribs that is tender enough to pull apart easily, deeply seasoned, beautifully browned, and coated with a glossy layer of barbecue sauce.
But good ribs are not simply a matter of putting meat on a grill and waiting.
The best results come from controlling several things at the right time: choosing the right ribs, removing the membrane, seasoning the meat properly, cooking it slowly enough to become tender, protecting it from drying out, and finishing it with enough heat to develop a sticky, caramelized barbecue glaze.
This Classic BBQ Ribs Recipe explains the entire process step by step, including what each stage is doing and how to recognize when the ribs are actually ready.
The method is designed for beginners, but the details are useful even if you have cooked ribs many times before.
You do not need an expensive smoker or complicated barbecue equipment. A grill, an oven, or a combination of the two can produce excellent ribs.
The goal is simple:
tender meat, flavorful seasoning, a smoky barbecue character, and a sauce that clings to the ribs without burning.
What Makes Great BBQ Ribs?
Before getting into the recipe, it helps to understand what you are trying to achieve.
Good ribs should not be tough, dry, or greasy. They should have enough structure to stay together when you pick them up, but the meat should become tender enough to bite through without fighting the bone.
The outside should have a concentrated, savory crust. The barbecue sauce should form a sticky glaze rather than remaining a thin, wet coating.
There is also an important distinction between tender and overcooked.
Tender ribs are soft and juicy while still retaining enough structure to hold together.
Overcooked ribs can become so soft that the meat falls apart before you can even serve it. That is not necessarily bad, but it is a different texture.
For classic BBQ ribs, I prefer a balance:
- tender meat
- moist interior
- concentrated beef or pork flavor
- flavorful bark
- lightly caramelized sauce
- bones that are easy to expose but not completely separated from the meat
The cooking process below is designed around that balance.
Check Our Ultimate American BBQ Meat Guide: How to Cut Chicken, Steak & Ribs + 8 Easy BBQ Recipes
Which Ribs Should You Buy?
The first decision is the type of ribs.
For this recipe, the best choice is pork ribs, particularly baby back ribs or St. Louis-style spare ribs.
Baby Back Ribs
Baby back ribs come from the upper portion of the rib cage near the backbone.
They are usually:
- smaller
- leaner
- more curved
- relatively quick to cook
- naturally tender when prepared correctly
They are an excellent choice for beginners because they are easy to handle and widely available.
A typical rack may weigh around 1½ to 2½ pounds, although sizes vary considerably.
St. Louis-Style Ribs
St. Louis-style ribs are cut from spare ribs.
They are:
- larger
- flatter
- meatier
- somewhat fattier
- excellent for long, slow cooking
Because they contain more meat and fat, they can produce exceptionally rich barbecue ribs.
They also benefit from longer cooking.
Spare Ribs
Traditional spare ribs are cut from the lower part of the rib cage.
They are usually larger and less uniform than baby backs.
If you buy a full rack of spare ribs, you may want to trim it into a more rectangular shape before cooking.
Do not throw away the trimmings. They can be used to flavor beans, soups, stocks, or other dishes.
Check Our Guide Slow-Cooked Beef Short Ribs Recipe – Tender, Rich & Flavorful
Ingredients
For approximately 4 servings:
For the ribs
- 2 racks pork ribs, about 4–5 pounds total
- 2 tablespoons yellow mustard
- 2 tablespoons olive oil, optional
Dry rub
- 3 tablespoons brown sugar
- 2 tablespoons paprika
- 1 tablespoon kosher salt
- 1 tablespoon black pepper
- 2 teaspoons garlic powder
- 2 teaspoons onion powder
- 1 teaspoon smoked paprika
- 1 teaspoon chili powder
- ½ teaspoon ground cumin
- ½ teaspoon cayenne pepper, optional
For cooking
- ½ cup apple juice
- 2 tablespoons apple cider vinegar
- ½ cup barbecue sauce
For finishing
- ½–1 cup barbecue sauce
- 1–2 tablespoons honey or maple syrup, optional
The quantities do not need to be treated as absolute rules.
The dry rub can be adjusted according to your taste. If you prefer sweeter ribs, increase the brown sugar slightly. If you prefer more heat, increase the cayenne or chili powder.
The important thing is to maintain balance.
Before You Start: Read the Entire Recipe
BBQ ribs are not difficult, but they are a recipe where timing matters.
Before cooking, make sure you know which method you are going to use.
This recipe gives you three practical approaches:
- Oven + grill, which is the most reliable method for beginners.
- Oven only, which works when you do not have access to a grill.
- Grill or smoker, which gives you the strongest barbecue character.
For beginners, I recommend starting with the oven + grill method.
Why?
Because the oven gives you precise control over the slow cooking stage, while the grill provides the final browning, smoke, and caramelization.
You do not have to keep adjusting a charcoal fire for several hours.
Step 1: Prepare the Ribs
Remove the ribs from their packaging and place them on a clean cutting board.
Pat both sides thoroughly dry with paper towels.
This matters because excess moisture can dilute the seasoning and interfere with browning.
Now inspect the rack.
You may see:
- loose pieces of meat
- large areas of excess fat
- thin flaps of tissue
- the membrane on the bone side
Trim away large pieces of loose fat or meat that are unlikely to cook evenly.
Do not try to remove every small piece of fat.
Fat is useful.
It melts slowly during cooking and contributes flavor and moisture.
Step 2: Remove the Membrane
This is one of the most important preparation steps.
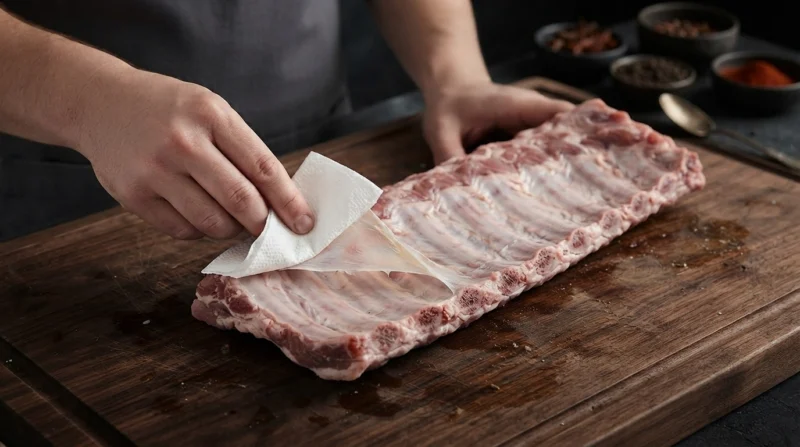
Turn the ribs over so the bone side faces upward.
You should see a thin, shiny, slightly translucent membrane covering the bones.
This is the silver skin, or rib membrane.
It is tough and does not become pleasantly tender during cooking.
If you leave it attached, it can make the underside of the ribs chewy and can also prevent seasoning from penetrating that side of the meat effectively.
How to remove it
Start at one corner of the rack.
Use the tip of a small knife to gently lift the membrane away from the bone.
Once you have enough of it separated, grab it with a paper towel.
The paper towel is useful because the membrane is slippery.
Pull slowly and steadily.
Ideally, the membrane should come away in one large piece.
If it tears, do not worry.
Simply lift another section and continue.
Beginner mistake: cutting too deeply
Do not dig your knife into the meat.
You only need to get underneath the membrane.
If you remove chunks of meat while trying to remove it, you are going too deep.
Take your time.
This is a small step, but it makes a noticeable difference in the finished ribs.
Step 3: Make the Dry Rub
Combine the brown sugar, paprika, salt, black pepper, garlic powder, onion powder, smoked paprika, chili powder, cumin, and cayenne.
Mix thoroughly.
The purpose of a dry rub is not simply to make the ribs taste spicy.
It creates several layers of flavor.
Salt seasons the meat.
Sugar helps with browning and creates a slightly caramelized exterior.
Paprika contributes color and mild pepper flavor.
Garlic and onion provide savory depth.
Black pepper adds warmth.
Smoked paprika can reinforce the smoky character, especially if you are cooking primarily in an oven.
Cayenne provides heat.
You can make the rub ahead of time and keep it in an airtight container.
Step 4: Season the Ribs
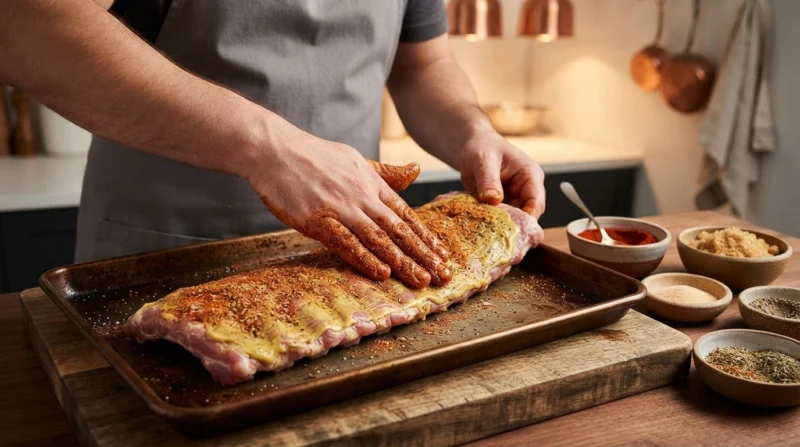
Place the ribs meat-side up.
Spread a thin layer of yellow mustard over the surface.
Do not worry about the finished ribs tasting strongly of mustard.
During cooking, much of the mustard flavor becomes integrated into the crust.
The mustard also helps the dry rub adhere to the meat.
If you prefer, you can use a small amount of olive oil instead.
Now sprinkle the dry rub evenly over the ribs.
Do not simply dump the entire mixture in one location.
Instead, distribute it across the surface and gently rub it into the meat.
Turn the ribs over and season the bone side as well.
Use enough seasoning to create an even coating, but do not build an excessively thick layer.
How Long Should the Ribs Sit Before Cooking?
If you have time, let the seasoned ribs rest in the refrigerator for 2–12 hours.
This gives the salt time to work into the surface of the meat.
If you are short on time, you can cook them immediately.
The difference is not large enough to justify delaying dinner for hours if you are hungry.
If you refrigerate the ribs, place them on a tray and cover them.
Remove them from the refrigerator about 20–30 minutes before cooking.
They do not need to reach room temperature completely.
Step 5: Prepare the Oven
Preheat the oven to:
275°F / 135°C
This relatively low temperature allows the connective tissue in the ribs to soften gradually.
Place a large sheet of heavy-duty aluminum foil on a baking tray.
For easier cleanup, you can use a second layer of foil underneath.
Put the seasoned ribs on the tray.
For two racks, you may need two trays.
Do not stack the ribs on top of each other.
Step 6: Add Moisture and Seal the Ribs
Mix:
- ½ cup apple juice
- 2 tablespoons apple cider vinegar
Pour a small amount around the ribs rather than directly over the seasoned surface.
You do not want to wash the dry rub away.
Cover the ribs tightly with aluminum foil.
The package should be reasonably sealed.
This creates a moist cooking environment.
During this stage, the ribs cook gently in their own juices and the added moisture.
The goal is not to boil the meat.
The liquid should remain mostly around the ribs rather than covering them.
Step 7: Slow Cook the Ribs
Place the covered ribs in the preheated oven.
For baby back ribs, begin checking after approximately 2½ hours.
For larger spare or St. Louis-style ribs, expect approximately 3–3½ hours, sometimes longer.
The exact time depends on:
- rib size
- meat thickness
- oven accuracy
- how tightly the foil is sealed
- starting temperature
- desired tenderness
This is why time alone should never determine whether ribs are finished.
Cooking is about texture, not just a clock.
What Happens During Slow Cooking?
Several important things are happening.
The meat gradually heats.
Fat begins to render.
Connective tissue starts breaking down.
Collagen converts into gelatin.
The meat becomes progressively softer.
This transformation takes time.
If you increase the oven temperature dramatically just to finish faster, you may get ribs that are technically cooked but less tender and less juicy.
Low and slow cooking gives the connective tissue time to soften.
That is the heart of good BBQ ribs.
How Do You Know When the Ribs Are Tender?
After about 2½ hours, carefully open the foil.
Be careful of escaping steam.
Use tongs to gently lift one end of the rack.
If the ribs bend easily and the surface begins to crack slightly, they are getting close.
You can also insert a thin skewer or toothpick between the bones.
It should enter with relatively little resistance.
Think about inserting it into soft butter.
If you feel strong resistance, the ribs need more time.
If the skewer slides in easily, the ribs are approaching the desired tenderness.
You can also use an instant-read thermometer, but ribs are more difficult to judge by temperature alone than a steak.
Temperature can help confirm that the meat is cooked, but texture is the better guide for final tenderness.
Step 8: Uncover the Ribs
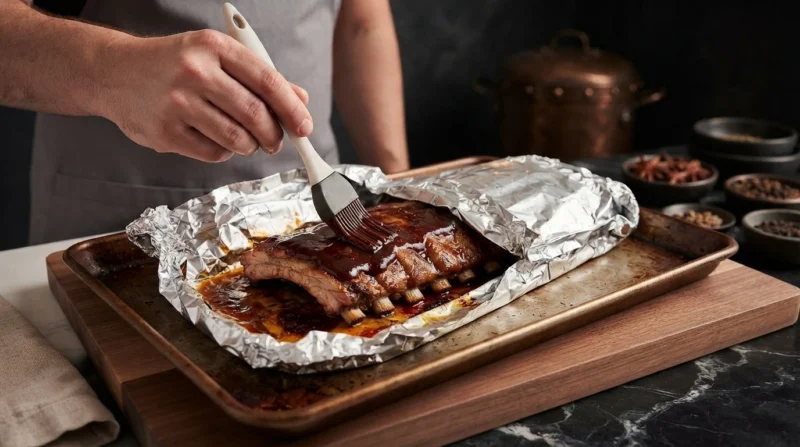
When the ribs are tender, remove the foil carefully.
There will be hot steam.
Lift the foil away from your face and hands.
At this point, the ribs may not look particularly attractive.
They may be pale and wet.
That is normal.
The next stage creates the barbecue exterior.
Transfer the ribs carefully to a clean tray or grill.
Discard the cooking liquid unless you have another use for it.
Step 9: Prepare the BBQ Sauce
You can use your favorite barbecue sauce.
A classic sauce generally combines several flavor elements:
- sweetness
- acidity
- salt
- tomato
- spices
- sometimes smoke
If your sauce is very sweet, be careful during the final grilling stage because sugar can burn quickly.
For an easy finishing glaze, combine:
- ½ cup barbecue sauce
- 1–2 tablespoons honey or maple syrup
You can also add a small splash of apple cider vinegar if the sauce tastes too sweet.
Taste the sauce before putting it on the ribs.
This is an important habit in cooking.
If the sauce tastes overly sweet by itself, it will become even sweeter as it reduces on the grill.
Step 10: Heat the Grill
Preheat your grill to medium-high heat.
You want approximately:
400–450°F / 200–230°C
Create two zones if possible:
- a hotter direct-heat zone
- a cooler indirect zone
The direct zone is for browning and caramelization.
The indirect zone is your safety area if the sauce begins to burn.
Clean the grill grates and lightly oil them.
Use a paper towel held with long tongs to spread a thin layer of cooking oil over the grates.
Never spray aerosol oil directly onto a hot flame.
Step 11: Grill the Ribs
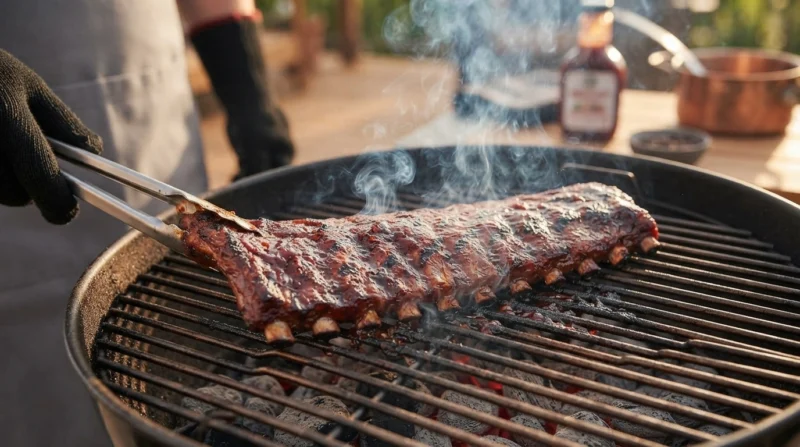
Place the ribs meat-side down over direct heat.
Watch them carefully.
They already contain cooked sugar from the rub, and the barbecue sauce will add even more.
You are not trying to cook the ribs from raw at this point.
You are finishing them.
Grill for approximately 2–4 minutes.
Look for:
- darkening edges
- grill marks
- bubbling sauce
- light caramelization
Do not walk away.
The difference between caramelized sauce and burned sauce can be less than a minute.
Step 12: Add the BBQ Sauce
Turn the ribs over.
Brush a thin layer of barbecue sauce over the meat side.
Do not immediately apply a thick coating.
A thin layer gives you better control.
Close the grill for about 1–2 minutes.
Then turn the ribs again.
Apply another thin layer.
Repeat once or twice if you want a thicker glaze.
The sauce should become glossy and sticky.
You want the surface to look lacquered rather than wet.
Why Apply Several Thin Layers?
This is a simple restaurant-style technique.
One thick layer of sauce contains a lot of moisture and sugar.
It can slide off the ribs or burn on the outside before it develops a good glaze.
Several thin layers gradually build the coating.
Each layer partially sets before the next one is added.
The result is:
sticky + glossy + concentrated + caramelized.
That is much better than a thick puddle of sauce.
Step 13: Watch for Flare-Ups
If fat drips onto the flames, you may get a sudden flare-up.
Do not panic.
Move the ribs to the indirect side of the grill.
Close the lid briefly.
Once the flames settle, continue cooking.
A little smoke is desirable.
Large flames are not.
Direct flames can burn the sauce and create unpleasant bitterness.
The goal is controlled heat, not a fire.
Step 14: Finish the Ribs
Continue grilling until the sauce is:
- glossy
- sticky
- slightly caramelized
- deeply colored
This usually takes only a few minutes.
Do not keep grilling simply because you think more time means better ribs.
The ribs have already spent hours becoming tender.
The grill is only finishing the exterior.
Step 15: Rest the Ribs
Transfer the ribs to a cutting board.
Let them rest for approximately 10–15 minutes.
This allows the juices and internal heat to settle.
It also gives the glaze time to become slightly tacky.
If you cut immediately, the sauce can be messy and the meat may release more juice than necessary.
Resting is not a complicated step.
Simply leave the ribs alone.
Step 16: Find the Bones
Turn the rack so you can see the bone structure.
Use a sharp chef’s knife or boning knife to cut between the bones.
A sharp knife is especially helpful here.
You do not want to saw aggressively through the meat.
Instead, identify the natural spaces between the bones and make controlled cuts.
This is also a good example of why knife sharpness matters in everyday cooking.
A dull knife tends to slide and requires more force.
A sharp knife gives you better control.
How to Cut Ribs Cleanly
Place the rack bone-side up.
You should be able to see where the bones run.
Cut between them with a single confident motion whenever possible.
If the meat is very tender, support the rack with your other hand.
Do not hold your fingers directly in front of the knife.
Keep your fingertips curled inward when stabilizing food.
Good knife technique is not about speed.
It is about control.
The Most Common BBQ Rib Mistakes
Even when following the same recipe, beginners often run into a few predictable problems.
Understanding them makes troubleshooting much easier.
Mistake 1: Leaving the membrane on
The membrane remains chewy and can prevent seasoning from reaching the underside.
Solution: remove it before seasoning.
Mistake 2: Cooking at very high heat from the beginning
High heat can dry the outer meat before the connective tissue has enough time to soften.
Solution: use low, slow heat for the main cooking stage.
Mistake 3: Adding BBQ sauce too early
Most barbecue sauces contain sugar.
Sugar burns.
If you cover raw ribs with sauce and cook them for several hours at high heat, the sauce can become bitter and black before the ribs are tender.
Solution: use dry rub for the slow cooking stage and save most of the sauce for the final stage.
Mistake 4: Making the sauce layer too thick
A thick coating can burn on the grill.
Solution: apply several thin layers.
Mistake 5: Not allowing enough cooking time
Ribs can look cooked while still being tough.
Solution: judge tenderness with a skewer or toothpick rather than relying only on the clock.
Mistake 6: Overcooking them until they completely collapse
Very soft ribs are not necessarily bad, but if you want classic barbecue texture, excessive cooking can make them difficult to handle.
Solution: stop when the meat is tender but the rack still has structure.
Mistake 7: Constantly opening the oven
Every time you open the oven, heat escapes.
Solution: leave the ribs alone during most of the cooking time and check them only when they are approaching tenderness.
What If the Ribs Are Still Tough?
This is one of the easiest problems to fix.
If the ribs have been cooking for several hours but remain tough, they probably need more time.
Cover them again.
Return them to the oven at 275°F / 135°C.
Continue cooking for another 30–45 minutes.
Check again.
Do not respond to tough ribs by dramatically increasing the heat.
The problem is usually not insufficient heat.
It is insufficient time for connective tissue to break down.
What If the Ribs Are Dry?
Dry ribs can result from several things.
Possible causes include:
- very lean ribs
- cooking uncovered for too long
- excessive oven temperature
- insufficient moisture during the covered stage
- overcooking
- cutting the ribs immediately after cooking
If the ribs are already dry, extra barbecue sauce can help the eating experience, but it cannot completely reverse moisture loss.
For the next batch, focus on moderate temperature, a well-sealed cooking environment, and careful timing.
What If the BBQ Sauce Burns?
If the sauce becomes black and bitter, the heat is too aggressive.
Move the ribs to indirect heat immediately.
If the burned layer is thin, you may be able to scrape or gently wipe it away and apply a fresh thin layer of sauce.
Do not keep cooking burned sauce in the hope that it will somehow become less bitter.
It will not.
Can You Make BBQ Ribs Entirely in the Oven?
Yes.
You can make excellent ribs without a grill.
Follow the slow-cooking method exactly as described.
When the ribs are tender, remove the foil.
Brush them with barbecue sauce.
Increase the oven temperature to approximately 425°F / 220°C.
Place the ribs uncovered on a tray.
Bake for approximately 5–10 minutes.
Brush with another thin layer of sauce.
Bake again until glossy and caramelized.
Watch carefully because the sauce can burn quickly.
For an even stronger finish, use the oven broiler for the final minute or two.
Stay beside the oven during broiling.
The broiler can transform a perfectly glazed rack into a burned rack very quickly.
Can You Cook Ribs Entirely on a Grill?
Yes.
For a traditional barbecue approach, set the grill up for indirect cooking.
The ribs should not sit directly over the hottest coals for the entire cooking period.
Place them on the indirect side.
Maintain a relatively low cooking temperature, approximately 250–275°F / 120–135°C.
Add wood chips or chunks if you want a stronger smoke flavor.
Cook until tender.
Then move the ribs over direct heat briefly for the final sauce and caramelization stage.
This method takes more attention than the oven method because grill temperature can fluctuate.
How to Use Charcoal
Charcoal can produce excellent ribs because it naturally contributes a deeper grilled character.
Arrange the charcoal on one side of the grill.
Leave the opposite side without direct charcoal underneath.
This creates two zones.
Put the ribs over the cooler side.
Control the temperature using the vents.
Do not constantly lift the lid.
Every unnecessary opening allows heat to escape and makes temperature control harder.
If the temperature rises too much, reduce the airflow slightly.
If the temperature falls too low, increase airflow.
Small adjustments are better than dramatic ones.
Should You Add Wood Smoke?
If you have a charcoal grill or smoker, wood smoke can add another layer of flavor.
Good choices include fruit woods such as:
- apple
- cherry
Or stronger woods such as:
- hickory
Use smoke as seasoning.
More is not automatically better.
Too much smoke can make ribs taste bitter or harsh.
The goal is for smoke to complement the meat and barbecue sauce rather than dominate them.
The Importance of Knife Technique
BBQ ribs are not usually thought of as a knife-skills recipe, but preparation and serving still require good technique.
When trimming the rack, use a sharp knife.
When removing loose tissue, keep the blade controlled.
When cutting the finished ribs, identify the natural spaces between the bones.
Do not try to force a dull knife through the meat.
A sharp blade actually gives you more control because you need less pressure.
Keep the cutting board stable.
If your board moves, place a damp kitchen towel underneath it.
This small adjustment can make a big difference in safety.
A Simple Knife-Safety Routine
Before cutting:
- Stabilize the cutting board.
- Make sure the knife is sharp.
- Keep the work surface uncluttered.
- Keep your supporting hand away from the blade.
- Use controlled movements.
- Never try to catch a falling knife.
- Do not cut toward your fingers.
- Slow down when trimming around bones.
Good cooking is not a race.
Especially for beginners, control is more important than speed.
How to Serve Classic BBQ Ribs
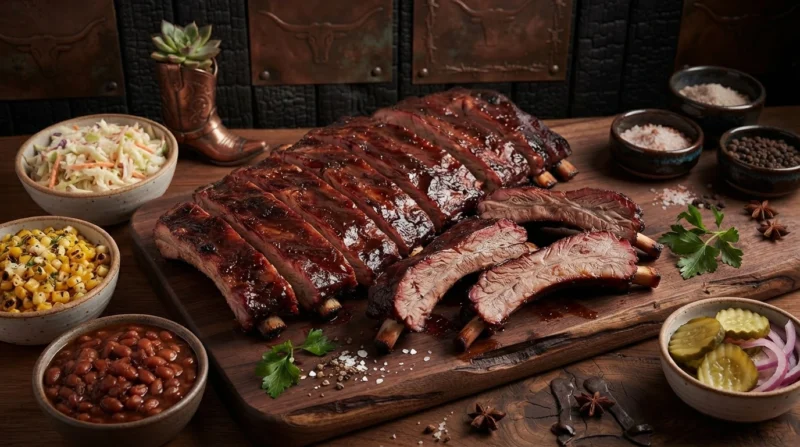
BBQ ribs are traditionally served with hearty side dishes.
Excellent choices include:
- creamy coleslaw
- potato salad
- corn on the cob
- baked beans
- grilled vegetables
- cornbread
- roasted potatoes
- green salad
- pickles
The best sides usually provide contrast.
Because ribs are rich and sweet, something acidic or fresh can make the meal feel more balanced.
Pickles, vinegar-based slaw, fresh salad, or grilled vegetables work particularly well.
A Simple BBQ Rib Plate
For an easy dinner, serve:
- 3–4 rib pieces per person
- creamy or vinegar-based coleslaw
- grilled corn
- baked beans
- extra barbecue sauce
- pickles
- lemon wedges, optional
You do not need ten different side dishes.
A few well-chosen sides are enough.
What BBQ Sauce Should You Use?
There is no single correct barbecue sauce.
Different regions and traditions favor different styles.
Some sauces are:
- sweet
- smoky
- spicy
- tangy
- vinegar-forward
- mustard-based
For these ribs, choose a sauce you genuinely enjoy eating.
The sauce becomes concentrated during grilling, so taste it before applying it.
If it is extremely sweet, consider mixing it with a little vinegar or mustard.
If it is very acidic, a small amount of honey can soften the sharpness.
Think of the sauce as another ingredient, not just a topping.
How to Make the Ribs Less Sweet
Many commercial barbecue sauces are fairly sweet.
If you prefer savory ribs, use less sauce and increase the dry-rub contribution.
You can also mix barbecue sauce with:
- apple cider vinegar
- Dijon mustard
- Worcestershire sauce
- hot sauce
Add these gradually.
Taste after each addition.
The goal is balance.
How to Make Spicy BBQ Ribs
For a hotter version, increase:
- cayenne pepper
- chili powder
- hot sauce
You can also add a small amount of crushed red pepper to the sauce.
Do not dramatically increase all three at once.
Heat accumulates.
A sauce that tastes moderately spicy in the bowl can taste significantly stronger after being concentrated on the grill.
How to Make Smoky BBQ Ribs Without a Smoker
There are several ways to increase smoky character.
You can use:
- smoked paprika
- a charcoal grill
- a small amount of liquid smoke in the sauce
- smoked salt
- wood chips on a grill
Be careful with liquid smoke.
A little can go a long way.
Too much can make the ribs taste artificial.
If possible, real wood smoke is preferable.
Can You Prepare the Ribs Ahead of Time?
Yes.
BBQ ribs are actually very convenient for entertaining because much of the cooking can be completed before guests arrive.
Cook the ribs slowly until tender.
Let them cool.
Wrap them tightly and refrigerate.
When you are ready to serve, bring them out and allow them to warm slightly.
Brush with barbecue sauce.
Finish them on the grill or in a hot oven.
This method can make dinner much less stressful.
Reheating Ribs
The biggest danger when reheating ribs is drying them out.
Place the ribs in a baking dish.
Add a small splash of apple juice or water.
Cover tightly with foil.
Heat at approximately 300°F / 150°C until warmed through.
Then uncover.
Brush with a small amount of fresh barbecue sauce.
Finish under the broiler or on the grill for a few minutes.
This recreates the glossy exterior.
How to Store Leftover Ribs
Let the ribs cool reasonably quickly after serving.
Place leftovers in an airtight container.
Refrigerate them and use within a few days.
For longer storage, freeze them in airtight packaging.
It is often better to freeze ribs in individual portions rather than as one large rack.
That way you can reheat only what you need.
What to Do With Leftover Rib Meat
If you have meat left on the bones, do not waste it.
Pull the meat from the bones and use it in:
- sandwiches
- tacos
- quesadillas
- loaded baked potatoes
- rice bowls
- pasta
- scrambled eggs
- breakfast hash
- salads
The smoky barbecue flavor can make ordinary leftovers much more interesting.
A Beginner’s Timeline
If you want to serve ribs for dinner at 7:00 PM, you could use this approximate schedule:
12:30 PM
Season ribs.
1:00 PM
Place ribs in the refrigerator.
3:00 PM
Preheat oven.
3:15 PM
Begin slow cooking.
5:45 PM
Start checking tenderness.
6:15 PM
Remove foil when tender.
6:30 PM
Preheat grill.
6:40 PM
Begin finishing ribs.
6:50 PM
Remove ribs from grill.
7:00 PM
Serve.
This is only a framework.
Your ribs may need more or less time.
The important thing is to leave yourself enough time.
It is much easier to hold tender ribs for a little while than to serve tough ribs because dinner is already supposed to be on the table.
Why Low and Slow Works
The phrase “low and slow” is repeated constantly in barbecue, but there is a real reason behind it.
Ribs contain connective tissue.
Connective tissue contains collagen.
When heated gently for an extended period, collagen gradually converts into gelatin.
That gelatin contributes to the soft, succulent texture associated with properly cooked ribs.
If you simply expose ribs to high heat for a short period, you can cook the muscle proteins without giving the connective tissue enough time to transform.
The result can be fully cooked but tough meat.
This is why barbecue is as much about patience as temperature.
Why Ribs Need a Finishing Stage
After several hours in a covered environment, the ribs can be tender but visually unimpressive.
The surface may be soft and wet.
The finishing stage solves this.
The grill or hot oven:
- dries the surface slightly
- browns the exterior
- caramelizes sugars
- concentrates the sauce
- creates grill marks
- adds smoke and roasted flavor
Think of the recipe as two separate jobs.
Stage 1: Make the meat tender.
Stage 2: Make the exterior delicious.
Trying to accomplish both at maximum heat simultaneously is what causes many rib recipes to fail.
Understanding the Difference Between Rub and Sauce
The dry rub and barbecue sauce perform different jobs.
The dry rub seasons the meat and creates the foundation of the crust.
The barbecue sauce creates the final glaze.
If you put too much sauce on at the beginning, you interfere with the crust and risk burning the sugars.
If you use no sauce at all, you can still have excellent ribs, but you lose the classic sticky BBQ finish.
Using them at different stages gives you more control.
Can You Skip the Sugar in the Rub?
Yes.
Sugar is traditional in many BBQ rubs, but it is not essential.
If you prefer a less sweet profile, reduce or eliminate the brown sugar.
The ribs will still brown because meat naturally undergoes browning reactions during cooking.
However, the sugar helps create a darker, more caramelized crust.
If you remove it, watch the final grilling stage carefully and rely more on the natural browning of the meat.
Can You Use a Different Meat?
The cooking principles in this recipe are designed for pork ribs.
Beef ribs are a different product.
They are generally larger, meatier, and often require different cooking times.
Do not assume that the exact timing in this recipe applies to beef ribs.
If you want to prepare beef ribs, treat them as a separate recipe.
Check Our Guide Perfect New York Strip Steak: How to Cook a Juicy, Tender Steak at Home
How to Tell if Your Ribs Are Ready Without a Thermometer
There are several visual and physical signs.
1. The meat has pulled back from the bones
You may notice the ends of the bones becoming more visible.
2. The rack bends easily
Lift one end with tongs.
The rack should bend naturally.
3. A skewer slides into the meat easily
Insert it between the bones.
It should meet relatively little resistance.
4. The meat looks moist and soft
The surface should not look dry and leathery.
5. The rack still holds together
For the texture described in this recipe, you want tenderness without complete collapse.
These signs are more useful than simply saying, “Cook for exactly three hours.”
Frequently Asked Questions
Should ribs be boiled before BBQ?
I do not recommend boiling them.
Boiling can remove flavor and gives you less control over the finished texture.
Slow cooking in a covered environment is a better approach.
Do I need to remove the membrane?
Yes, if it is still attached.
It is tough and unpleasant to chew.
Removing it is one of the easiest ways to improve the finished ribs.
Can I use baby back ribs?
Absolutely.
They are one of the best choices for this recipe.
Because they are usually smaller and leaner than spare ribs, start checking them for tenderness earlier.
Can I use spare ribs?
Yes.
They work extremely well.
Expect them to require more time because they are larger and meatier.
Can I use homemade BBQ sauce?
Definitely.
Homemade sauce allows you to control sweetness, acidity, spice, and smoke.
It is particularly useful if you find commercial sauces too sweet.
Why are my ribs tough?
Usually because they have not cooked long enough for the connective tissue to soften.
Continue cooking at a moderate temperature and check again after 30–45 minutes.
Why did my BBQ sauce burn?
Most likely the grill was too hot or the sauce was applied too early.
BBQ sauce contains sugar, which burns easily.
Apply it near the end of cooking.
Should ribs be cooked meat-side up or down?
During the covered oven stage, either orientation can work, although I generally place them meat-side up.
During the grilling stage, start meat-side down briefly to develop grill marks, then finish with the sauced meat side facing up.
How many ribs should I serve per person?
As a general guide, plan for approximately ½ rack per hungry adult when ribs are the main course and substantial sides are served.
For lighter eaters or a larger meal with many side dishes, less may be enough.
Can I cook ribs the day before?
Yes.
Slow-cook them until tender, refrigerate them, and finish them with sauce on the grill or in a hot oven the next day.
This is an excellent method for entertaining.
Can I freeze BBQ ribs?
Yes.
Wrap them tightly and place them in an airtight freezer-safe package.
For best quality, use them within a few months.
Thaw them in the refrigerator before reheating.
Final Tips for Perfect Classic BBQ Ribs
If you remember only a few things from this recipe, remember these:
Remove the membrane.
It is tough and unnecessary.
Season the ribs before cooking.
The dry rub creates the flavor foundation.
Cook low and slow.
Tender ribs need time.
Do not put a thick layer of sweet sauce on too early.
Sugar burns.
Use texture to judge doneness.
A skewer should slide into the meat with little resistance.
Finish over high heat.
The final stage creates the caramelized barbecue exterior.
Apply sauce in thin layers.
This gives you a glossy glaze instead of burnt patches.
Watch the grill carefully.
The final few minutes can make or break the ribs.
Rest before cutting.
Ten to fifteen minutes is enough.
Use a sharp knife.
Cut between the bones rather than sawing aggressively through the meat.
Classic BBQ Ribs Recipe at a Glance
Preparation
Approximately 20–30 minutes, plus optional seasoning time.
Slow cooking
Approximately 2½–3½+ hours depending on the rib type and size.
Finishing
Approximately 5–10 minutes.
Resting
10–15 minutes.
Oven temperature
275°F / 135°C
Finishing grill temperature
Approximately 400–450°F / 200–230°C
Servings
Approximately 4.
The Complete Method
- Remove the membrane from the bone side of the ribs.
- Trim only large pieces of excess fat or loose tissue.
- Pat the ribs dry.
- Mix the dry rub.
- Coat the ribs lightly with mustard.
- Apply the dry rub evenly to both sides.
- Refrigerate for 2–12 hours if desired.
- Preheat the oven to 275°F / 135°C.
- Place the ribs on a foil-lined tray.
- Add apple juice and apple cider vinegar around the ribs.
- Cover tightly with foil.
- Slow-cook until the ribs become tender.
- Check with a skewer or toothpick.
- Remove the foil carefully.
- Prepare the grill for medium-high heat.
- Place the ribs briefly over direct heat.
- Apply a thin layer of BBQ sauce.
- Grill until the sauce becomes glossy and caramelized.
- Add another thin layer if desired.
- Move the ribs to indirect heat if flare-ups occur.
- Remove from the grill.
- Rest for 10–15 minutes.
- Cut between the bones with a sharp knife.
- Serve immediately with your favorite BBQ sides.
Final Thoughts
Great BBQ ribs are not about complicated equipment or secret ingredients.
They are about understanding what the meat needs at each stage.
First, prepare the ribs properly.
Then season them generously but sensibly.
Give the connective tissue enough time to soften.
Protect the meat during the long cooking stage.
Finally, bring the ribs to the grill and build the sauce layer by layer until the outside becomes dark, glossy, sticky, and intensely flavorful.
The biggest beginner mistake is trying to rush the process.
Ribs reward patience.
If they are tough, they usually need more time.
If the sauce burns, it usually needs less heat.
If the outside is pale, it needs a stronger finishing stage.
Once you learn to recognize these signals, cooking ribs becomes much less mysterious.
And that is the real secret to a successful Classic BBQ Ribs Recipe:
do not cook by the clock alone—cook by what the meat is telling you.
Serve the ribs hot, give everyone plenty of napkins, and do no be surprised if the first rack disappears faster than expected.