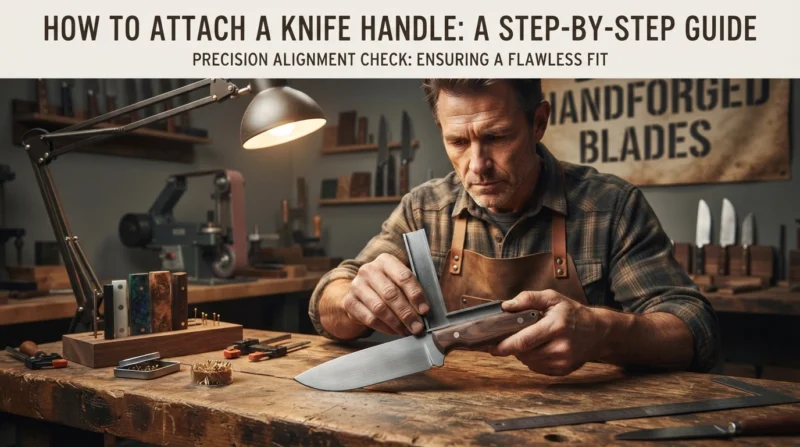
How to Attach a Knife Handle
Attaching a knife handle to a blade is one of the most important steps in making a finished knife. A good handle should be comfortable, secure, properly aligned, and strong enough to withstand years of normal use.
The process is not particularly complicated, but small mistakes can affect the final result. Poor alignment, insufficient surface preparation, excessive adhesive, or incorrect clamping can leave the handle crooked, weak, or difficult to finish.
This guide explains how to attach a knife handle to a tang step by step, from the initial dry fit to final shaping and finishing.
It is suitable for both beginners making their first knife and experienced makers looking for a reliable assembly procedure.
What You Need Before You Start
Before attaching the handle, prepare all of the necessary tools and materials.
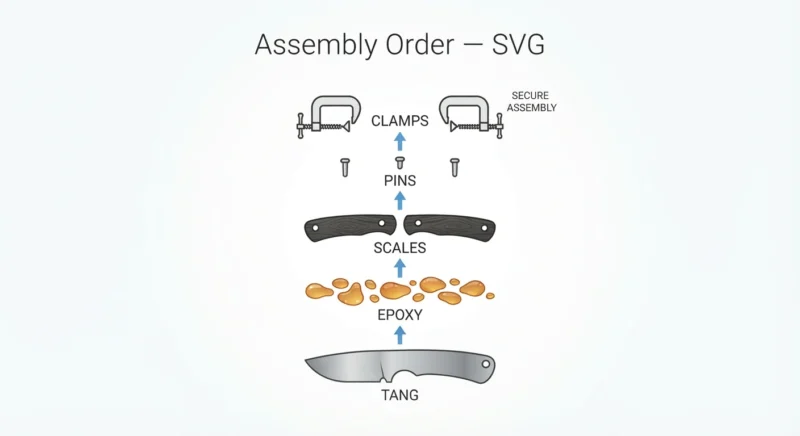
You will typically need:
- A knife blade with a suitable tang
- Two handle scales, or a prepared solid handle
- Epoxy adhesive suitable for knife making
- Abrasive paper or sanding discs
- Degreasing solvent
- Clamps
- A flat work surface
- A small square
- Measuring tools
- Drill and suitable drill bits
- Files or a rotary tool
- Mixing sticks
- Disposable mixing surface
- Masking tape
- Gloves and eye protection
Depending on the handle design, you may also need:
- Pins
- Corby bolts
- Mosaic pins
- Bolts and nuts
- A handle alignment jig
- Spacers or temporary supports
The most important thing is to prepare everything before mixing the epoxy.
Once the adhesive is mixed, you have limited working time.
Check Our Guide Knife Handle Materials Explained: Choosing the Best Material for Your Knife
Step 1: Inspect the Tang and Handle
Before doing any permanent assembly, inspect the tang and handle material carefully.
The tang should be free from major burrs, sharp edges, excessive scale, oil, or other contamination.
The handle material should also be clean and properly prepared.
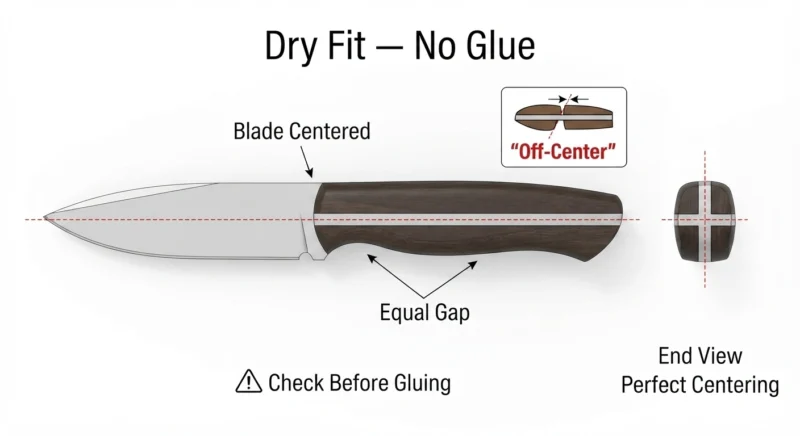
If you are using two scales, place them against the tang and check their overall dimensions.
At this stage, do not use glue.
This is called a dry fit.
A dry fit allows you to identify problems before they become permanent.
Check:
- Does the tang fit into the handle?
- Are the scales positioned correctly?
- Is the blade centered?
- Are the handle materials symmetrical?
- Are the pins or bolts aligned?
- Is there enough material around the tang?
- Can the handle be clamped securely?
Never skip the dry-fit stage.
It is much easier to correct a problem when nothing has been glued.
Check Our Guide Laminated Steel Knife Blanks
Step 2: Prepare the Tang
Proper surface preparation is critical for a strong epoxy bond.
A polished tang may look attractive, but a highly smooth surface is not always ideal for bonding.
The bonding area should normally have a clean, slightly roughened surface that gives the adhesive something to grip.
Use suitable abrasive material to remove surface contamination and create a consistent bonding texture.
Pay particular attention to:
- Oil
- Grease
- Rust
- Scale
- Polishing compound
- Dirt
After mechanical preparation, clean the bonding surface with an appropriate degreasing agent.
Allow the surface to dry completely.
Do not touch the prepared bonding area with your bare fingers afterward.
Oil from your skin can contaminate the surface.
https://yashkadesigns.com/2-pcs-knife-handle-patch-material-diy-crafts-raw
Step 3: Prepare the Handle Material
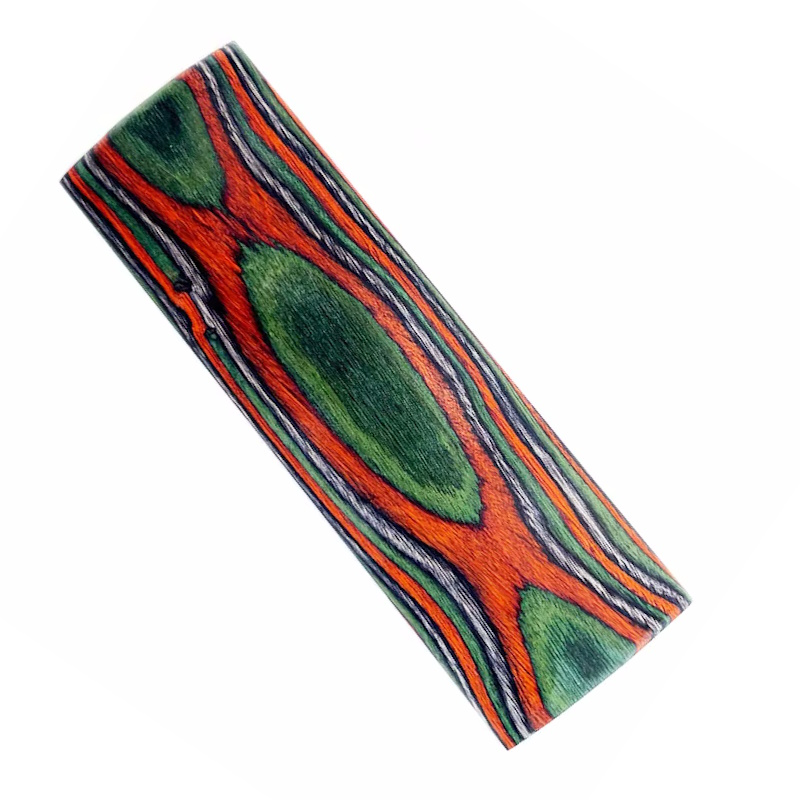
The handle material needs to be prepared just as carefully as the tang.
For two handle scales, the surfaces that contact the tang should be flat and properly prepared.
Place the scales together and check them for gaps or uneven surfaces.
If a scale is not flat, the adhesive may have to fill an unnecessarily large gap.
That can make alignment more difficult and may reduce the quality of the finished assembly.
The mating surfaces should be clean, dry, and appropriately abraded for the material being used.
Different handle materials behave differently, so always consider the characteristics of the specific material.
Wood, stabilized wood, micarta, G10, composites, and synthetic materials may require different preparation methods.
Step 4: Dry-Fit Everything One More Time
This is the last opportunity to check the complete assembly before applying adhesive.
Put the handle scales, pins, and blade together exactly as they will be assembled.
Check the knife from several directions.
Look at it from:
- The top
- The bottom
- The spine
- The edge
- Both sides
The blade should be centered relative to the handle.
The handle should sit squarely against the tang.
The pins should pass through their holes without forcing the scales out of position.
If something does not fit correctly, fix it now.
Do not rely on epoxy to correct a mechanical fitting problem.
Step 5: Make Sure the Blade Is Properly Aligned
Correct alignment is one of the most important parts of handle installation.
Even a beautifully shaped handle can look wrong if the blade is tilted relative to it.
A simple temporary jig can make this much easier.
Place the knife on a flat, level surface and use a small square or another suitable guide to check the blade position.
The goal is to prevent the blade from rotating or leaning while the adhesive cures.
A temporary support can be made from simple materials such as:
- Wood
- Plastic
- Metal
- Rigid cardboard
- A purpose-made knife-making jig
The jig does not need to be complicated.
Its job is simply to hold the blade and handle in the correct position while the epoxy cures.
Why a Jig Helps
When epoxy is freshly applied, the handle can move surprisingly easily.
Clamping pressure can also cause the scales to shift.
A jig provides a reference point and prevents unwanted movement.
This is particularly useful when working with a symmetrical handle where even a small angle can become obvious after final shaping.
Check Our Guide How to Choose a Knife Blank
Step 6: Protect the Blade
Before applying epoxy, protect the parts of the knife that should remain clean.
Masking tape can be applied around areas where adhesive could accidentally spread.
This is especially useful around:
- The ricasso
- The plunge line
- The front of the handle
- Decorative spacers
- Finished blade surfaces
Removing cured epoxy is much more difficult than preventing it from getting there in the first place.
A few minutes of preparation can save a considerable amount of cleanup later.
Step 7: Install Pins or Fasteners
If your handle design uses pins or bolts, prepare them before mixing the adhesive.
Cut pins slightly longer than the finished handle width.
You want enough extra material on both sides to allow for final grinding or sanding.
However, do not make them unnecessarily long.
During assembly, the pins should pass through the handle and tang without excessive force.
Perform another dry fit with all pins installed.
This is particularly important with multiple pins because a small alignment error can prevent the entire assembly from fitting together.
Check Our Guide Mosaic Pins for Knife Handles
Step 8: Mix the Epoxy
Choose an adhesive appropriate for the materials being joined and follow the manufacturer’s instructions for mixing ratio, working time, and curing conditions.
Mix the components thoroughly.
Incomplete mixing can result in a weak or partially cured bond.
Scrape the sides and bottom of the mixing container while mixing.
Do not guess the mixing ratio.
Measure the components according to the adhesive manufacturer’s instructions.
Once the epoxy is mixed, work efficiently but without rushing.
You should have enough time to assemble the handle properly.
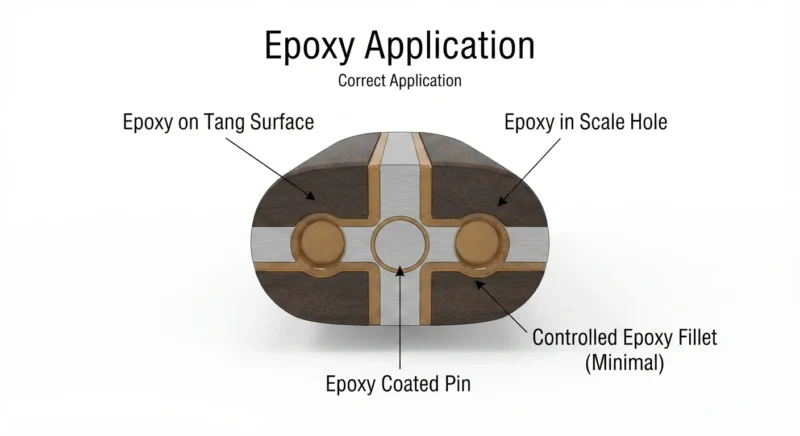
Step 9: Apply the Epoxy
Apply a consistent layer of epoxy to the prepared bonding surfaces.
The goal is complete coverage without creating unnecessarily large pools of adhesive.
Make sure the adhesive reaches the important bonding areas around the tang and inside the handle.
If pins are being used, adhesive can also be applied appropriately to the pin surfaces.
Do not rely on a few small spots of epoxy.
The entire intended bonding area should be properly covered.
Step 10: Assemble the Handle
Now bring the components together.
Insert the pins or fasteners and carefully position the handle scales against the tang.
Do not force the components together aggressively.
Instead, bring everything together gradually while checking alignment.
At this point, excess epoxy will normally begin to squeeze out.
That is generally a good indication that the bonding surfaces have been covered.
Remove the larger excess carefully while the epoxy is still workable.
Avoid disturbing the alignment while cleaning.
https://yashkadesigns.com/1-piece-knife-handle-patch
Step 11: Check Alignment Before Clamping
This is one of the most important moments in the entire process.
Before tightening the clamps, inspect the knife again.
Look along the spine.
Look along the edge.
Check both sides.
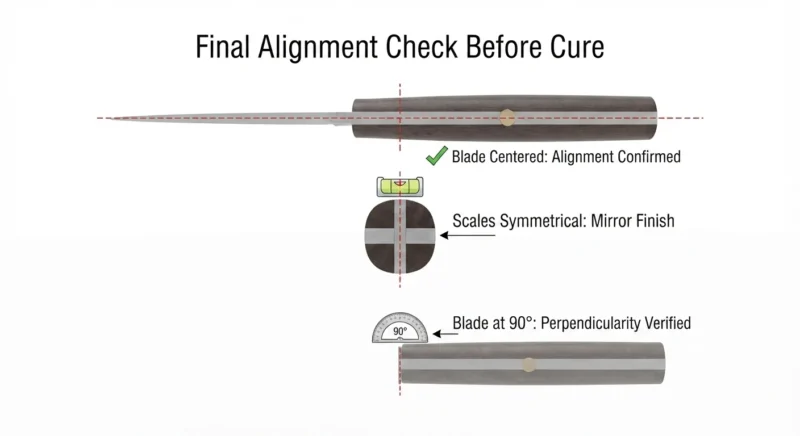
Confirm that:
- The blade is centered.
- The handle is straight.
- The scales are properly positioned.
- The pins are correctly aligned.
- The front of the handle is sitting where you want it.
If the blade is crooked now, clamping will not magically fix it.
Correct the position before applying final pressure.
Check Our Guide How to Choose a Custom Knife Maker
Step 12: Clamp the Handle
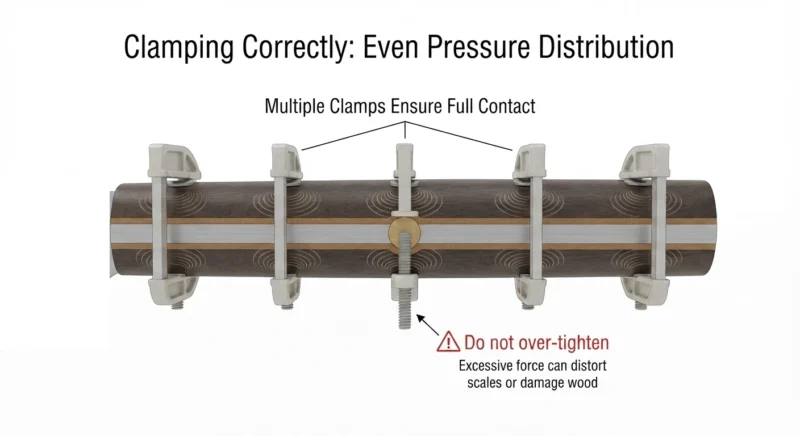
Use enough clamping pressure to hold the assembly securely, but avoid excessive force.
Too much pressure can squeeze out too much adhesive and can also move the handle components.
Clamps should provide controlled pressure rather than extreme force.
If necessary, use protective pieces between the clamps and the handle.
This helps prevent damage to the handle material.
After clamping, check alignment one more time.
The knife should remain in the correct position throughout the curing process.
Step 13: Allow the Epoxy to Cure
Leave the knife undisturbed for the full curing period specified for the adhesive.
Do not begin shaping the handle simply because the epoxy feels hard on the outside.
The adhesive needs sufficient time to develop its intended strength.
Temperature can also affect curing.
Cold conditions may significantly slow the process, while excessive heat can create other problems.
Follow the adhesive manufacturer’s recommended curing conditions.
When in doubt, allow additional curing time rather than removing the clamps too early.
Step 14: Remove the Clamps and Inspect the Assembly
Once the epoxy has fully cured, remove the clamps.
Inspect the handle carefully.
Check for:
- Gaps
- Loose components
- Misalignment
- Uncured adhesive
- Cracks
- Movement between the handle and tang
Try to detect any structural problem before beginning the final shaping process.
If the assembly is solid and correctly aligned, you can proceed to shaping.
Step 15: Shape the Handle
Now the handle can be shaped to its final profile.
The exact process depends on the material and the desired design.
A belt grinder, spindle sander, files, rasps, or hand sanding can be used depending on the material and available equipment.
Remove material gradually.
Do not try to achieve the final shape in one aggressive operation.
Frequently stop and inspect the handle from different angles.
Check:
- Symmetry
- Thickness
- Comfort
- Transition into the blade
- Pin position
- Spine alignment
- Edge alignment
Remember that every sanding operation removes material.
It is easy to remove more.
It is impossible to put material back without rebuilding the handle.
Check Our Guide Japanese Wa Handles: Materials, Installation, Replacement, and Care
Step 16: Blend the Handle Into the Tang
The transition between the handle and the blade is one of the most visible parts of a finished knife.
Take your time here.
The front of the handle should transition cleanly into the tang and blade geometry.
Avoid creating sharp unwanted steps or uneven transitions.
When working close to the blade, use controlled movements and appropriate protection.
The goal is a clean transition without damaging the finished blade.
Step 17: Finish the Handle
After the main shaping is complete, progressively refine the surface.
The appropriate finishing method depends entirely on the handle material.
For wooden handles, this may involve progressively finer abrasives followed by a suitable finish.
For synthetic or composite materials, the finishing sequence may be different.
Work through the abrasive grades gradually rather than jumping directly from a coarse abrasive to a very fine one.
Inspect the surface under good lighting.
Scratches that are invisible at one stage can become obvious after finishing.
Common Mistakes When Attaching a Knife Handle
1. Skipping the Dry Fit
One of the most common mistakes is applying epoxy before checking whether everything fits.
Always perform a complete dry assembly first.
2. Poor Surface Preparation
Oil, grease, polishing compound, rust, or dirt can interfere with bonding.
Clean and prepare the surfaces carefully.
3. Incorrect Alignment
A handle that is only slightly crooked during assembly may look dramatically wrong after final shaping.
Use a flat reference surface and a simple jig when necessary.
4. Using Too Much Clamping Pressure
More pressure does not necessarily mean a stronger bond.
Excessive pressure can squeeze out too much adhesive or shift the components.
5. Touching Prepared Surfaces
After cleaning and preparing the bonding surfaces, avoid touching them with bare hands.
Keep them clean until adhesive is applied.
6. Working Too Slowly With Fast-Curing Adhesive
If the adhesive has a limited working time, preparation should be completed before mixing.
Have the blade, scales, pins, clamps, tape, and tools ready.
7. Shaping the Handle Too Quickly
Do not begin aggressive grinding before the adhesive has fully cured.
And even after curing, remove material gradually.
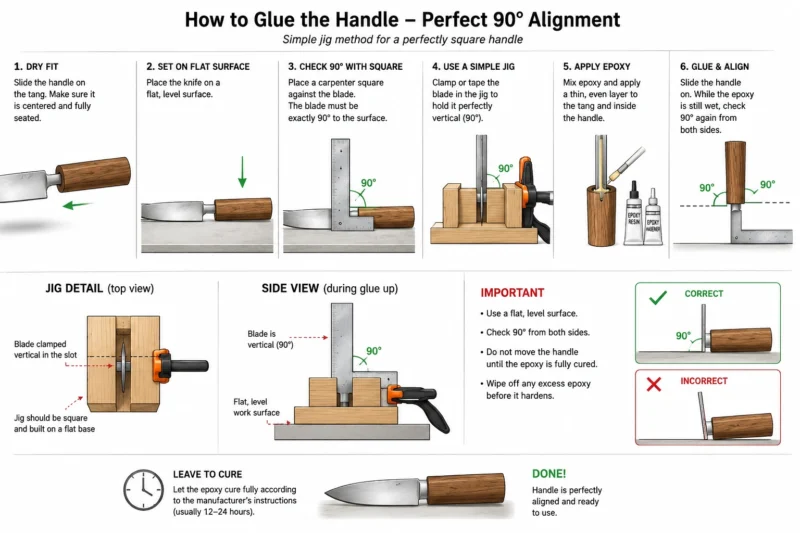
How to Keep the Blade at 90° During Handle Installation
One of the easiest ways to improve handle installation is to use a simple temporary alignment jig.
The basic principle is simple.
The knife is positioned on a flat surface, while a small vertical guide supports the blade or handle.
This creates a fixed reference that prevents the blade from leaning during assembly.
You do not need an expensive professional jig.
A simple, accurately positioned support can be enough.
The important thing is that the reference surfaces are straight, stable, and square.
Basic Procedure
- Place the blade on a flat surface.
- Position the handle components.
- Check the blade from the front and rear.
- Place a square against the blade.
- Adjust the handle until the blade is correctly aligned.
- Install the temporary support.
- Apply and assemble the epoxy.
- Clamp the handle.
- Check alignment again.
- Leave the assembly undisturbed until fully cured.
This simple procedure can dramatically reduce alignment problems.
Knife Handle Attachment: The Most Important Principle
The most important principle is simple:
Do not use adhesive to compensate for poor fitting.
The mechanical fit should already be correct before the epoxy is applied.
The epoxy should create a strong bond between properly prepared surfaces, not fill large unwanted gaps or correct major alignment problems.
Good knife construction is mostly about preparation.
If the dry fit is correct, the surfaces are properly prepared, the blade is aligned, and the adhesive is used correctly, the actual gluing process becomes much easier.
Final Checklist
Before considering the handle installation complete, check the following:
Before Gluing
☐ Handle fits correctly
☐ Tang is properly prepared
☐ Handle surfaces are prepared
☐ Pins or fasteners fit correctly
☐ Complete dry fit has been performed
☐ Blade alignment has been checked
☐ Clamps and tools are ready
During Assembly
☐ Epoxy is mixed correctly
☐ Bonding surfaces are completely covered
☐ Handle is properly positioned
☐ Pins are aligned
☐ Blade is straight
☐ Clamps provide controlled pressure
☐ Excess adhesive is removed carefully
After Assembly
☐ Epoxy has fully cured
☐ Handle is firmly attached
☐ Blade remains correctly aligned
☐ No gaps are visible
☐ Handle is shaped gradually
☐ Surface is progressively finished
Conclusion
Attaching a knife handle does not require complicated equipment, but it does require careful preparation and attention to alignment.
The most important steps are performed before the epoxy is mixed.
A proper dry fit, clean bonding surfaces, accurate alignment, controlled clamping, and sufficient curing time are the foundation of a strong and professional result.
Whether you are installing a handle on a finished knife blade or working with a knife blank, taking a few extra minutes to check the fit and alignment can make a major difference in the final knife.
A good handle should not only look beautiful. It should feel secure, remain properly aligned with the blade, and provide a durable connection between the maker and the finished knife.
Take your time during assembly, check your alignment more than once, and remember one simple rule:
Measure, dry-fit, align, then glue.