
Chicken Cutlets Recipe
Crispy chicken cutlets are one of those recipes that look simple but become dramatically better when you understand a few basic techniques. Thin chicken cutlets should be tender and juicy inside, while the outside should have a deeply golden, crisp crust that stays crunchy instead of turning greasy or soggy.
The good news is that you do not need complicated equipment or unusual ingredients to make excellent chicken cutlets at home. You need thin, evenly prepared chicken, a well-organized breading station, properly seasoned coating, oil at the right temperature, and enough attention during cooking to prevent the crust from burning before the chicken is done.
This recipe explains the entire process from beginning to end, including how to cut and flatten the chicken, how to season every layer, how to bread the cutlets without creating a thick or patchy coating, how to choose the right pan and oil, how to recognize when the oil is ready, and how to keep the finished cutlets crisp.
It is written for beginners, so the goal is not simply to tell you what to do. The goal is to explain why you are doing it, what you should see and hear at each stage, and what to do if something goes wrong.
Why This Crispy Chicken Cutlets Recipe Works
There are several small details that make the difference between an average breaded chicken breast and genuinely crispy chicken cutlets.
1. The chicken is thin and evenly shaped
Chicken breasts are naturally thicker in the center than at the edges. If you cook them without flattening them, the outside may become dry before the center is properly cooked.
Thin cutlets solve this problem.
Because the meat is relatively thin, it cooks quickly and evenly. You can develop a crisp golden crust without keeping the chicken in the pan for a long time.
2. Every layer of the breading is seasoned
A common beginner mistake is seasoning only the breadcrumbs.
That can leave the finished chicken tasting bland even when the crust looks beautiful.
Instead, the chicken itself should be seasoned, and the flour, egg mixture, and breadcrumbs should also contribute flavor.
The result is much more balanced.
3. The coating is pressed onto the chicken
The breading needs to adhere firmly to the surface.
If you simply dip the chicken into the flour, egg and breadcrumbs and immediately put it into the pan, loose crumbs can fall away during frying.
A gentle but deliberate pressing of the breadcrumbs onto the chicken creates a more complete crust.
4. The oil must be hot enough
This is one of the most important parts of the recipe.
If the oil is too cool, the breadcrumbs absorb oil before they become crisp. The result is greasy chicken with a heavy coating.
If the oil is excessively hot, the breadcrumbs can become dark or burnt while the chicken is still cooking.
You want a steady, lively sizzle.
5. The finished chicken is transferred to a rack
Putting freshly fried chicken directly onto a flat plate can trap steam underneath the crust.
That steam softens the coating.
A wire rack allows air to circulate underneath the cutlets while excess oil drains away.
What Are Chicken Cutlets?
A chicken cutlet is a piece of chicken breast that has been cut or flattened into a relatively thin, even piece.
The term can refer to chicken that has been sliced horizontally from a breast or chicken that has been pounded thinner with a meat mallet.
For this recipe, either method works.
The important point is uniform thickness.
You do not need the chicken to be paper-thin. A thickness of roughly ¼ to ½ inch is practical for pan-frying.
Thinner cutlets cook extremely quickly, while slightly thicker cutlets remain a little juicier and more substantial.
Chicken Cutlets vs. Chicken Tenders
These terms are sometimes used interchangeably, but they are not exactly the same.
Chicken tenders are the small tenderloin muscles located underneath the chicken breast.
Chicken cutlets are usually made from the breast itself.
For this recipe, use boneless, skinless chicken breasts and turn them into cutlets yourself.
This gives you control over the thickness and shape.
Ingredients
For the Chicken
- 2 large boneless, skinless chicken breasts
- 1 teaspoon kosher salt
- ½ teaspoon freshly ground black pepper
- ½ teaspoon garlic powder
- ½ teaspoon paprika
For the Breading
- 1 cup all-purpose flour
- 2 large eggs
- 2 tablespoons milk or water
- 1½ cups plain breadcrumbs
- ½ cup finely grated Parmesan cheese
- 1 teaspoon dried Italian seasoning
- ½ teaspoon garlic powder
- ½ teaspoon paprika
- ½ teaspoon kosher salt
- ¼ teaspoon black pepper
For Frying
- Neutral cooking oil, such as canola, vegetable, sunflower, or peanut oil
You need enough oil to create a shallow layer across the bottom of the pan, generally around ⅛ to ¼ inch deep.
You are not deep-frying the chicken.
Equipment
You do not need specialized equipment.
A useful setup includes:
- large cutting board
- sharp chef’s knife
- meat mallet or rolling pin
- plastic wrap or parchment paper
- three shallow bowls or dishes
- large heavy skillet
- instant-read meat thermometer
- tongs
- wire cooling rack
- baking sheet
A heavy skillet is especially helpful because it holds heat more steadily when cold chicken is added.
Step 1: Prepare the Chicken
Start by placing the chicken breasts on a clean cutting board.
Pat them thoroughly dry with paper towels.
This step is easy to overlook, but it matters.
Surface moisture makes it more difficult for the flour to adhere evenly.
It can also create unnecessary splattering when the chicken enters hot oil.
Do not wash raw chicken.
Instead, simply remove it from its packaging and pat it dry.
Step 2: Cut the Chicken Into Even Cutlets
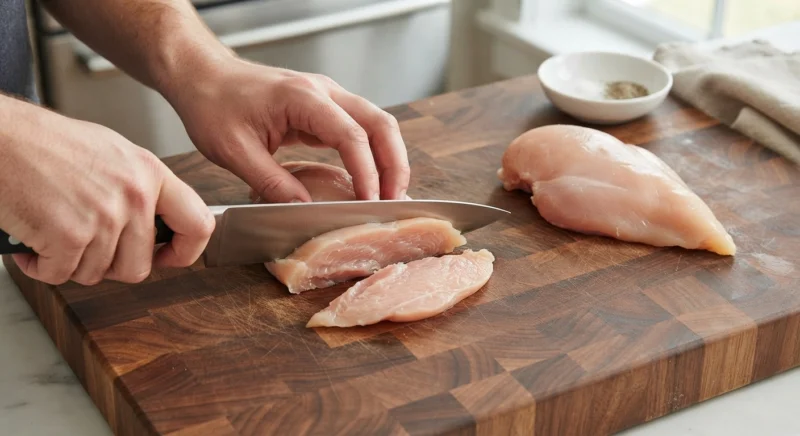
Place one chicken breast flat on the cutting board.
Hold your knife parallel to the cutting board.
Carefully slice horizontally through the thickest part of the breast.
Your goal is to divide one thick breast into two thinner pieces.
Do not rush this step.
A sharp knife gives you much more control than a dull knife because you can make a clean slicing motion instead of forcing the blade through the meat.
If the breast is particularly thick, you can then gently flatten the cutlet.
Repeat with the second breast.
You should now have approximately four cutlets.
Knife Technique for Beginners
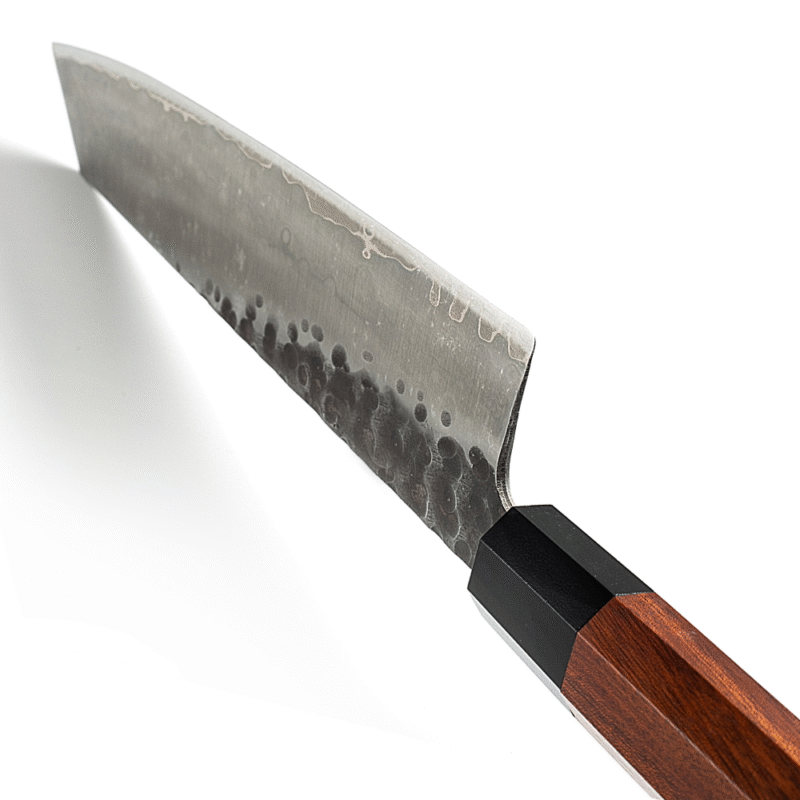
This is a good recipe to practice safe knife technique.
Keep your non-knife hand in a claw position with your fingertips curled inward.
Keep the blade controlled and make smooth horizontal cuts.
Do not try to cut through the chicken using a sawing motion with excessive force.
A sharp chef’s knife should do most of the work.
Keep the cutting board stable. If it moves on your countertop, place a damp kitchen towel underneath it.
Step 3: Flatten the Cutlets
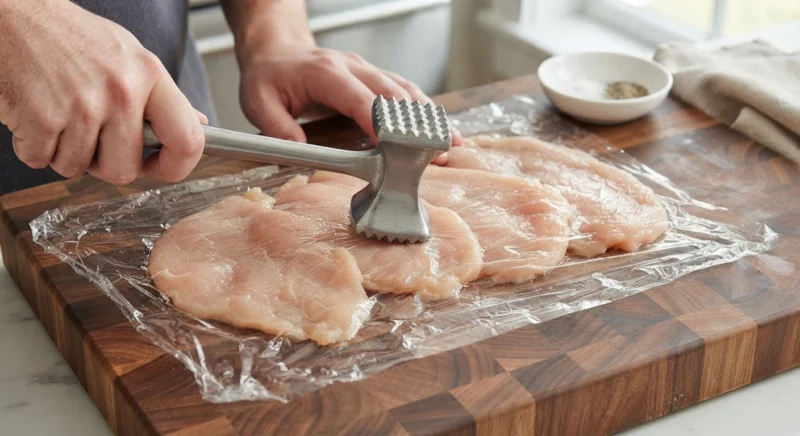
Place one cutlet between two pieces of plastic wrap or parchment paper.
Gently pound the chicken with a meat mallet.
Start in the thickest area and work outward.
You are not trying to destroy the chicken.
You simply want to make the thickness more uniform.
If you do not have a meat mallet, the bottom of a heavy skillet or a rolling pin can work.
Aim for approximately ¼ to ½ inch thickness.
Why uniform thickness matters
Imagine a cutlet that is ¼ inch thick on one side and ¾ inch thick in the center.
The thin edge will cook much faster.
By the time the thick center reaches a safe temperature, the thin edge may already be dry.
Flattening creates a much more forgiving piece of chicken.
Step 4: Season the Chicken
Season both sides of the chicken with salt, black pepper, garlic powder and paprika.
Try to distribute the seasoning evenly.
Do not create one heavily seasoned area and leave another almost unseasoned.
Let the chicken sit for a few minutes while you prepare the breading station.
You can also season the chicken several minutes in advance.
Salt does more than make food taste salty. It helps season the meat itself rather than leaving all the flavor in the crust.
Step 5: Set Up the Breading Station
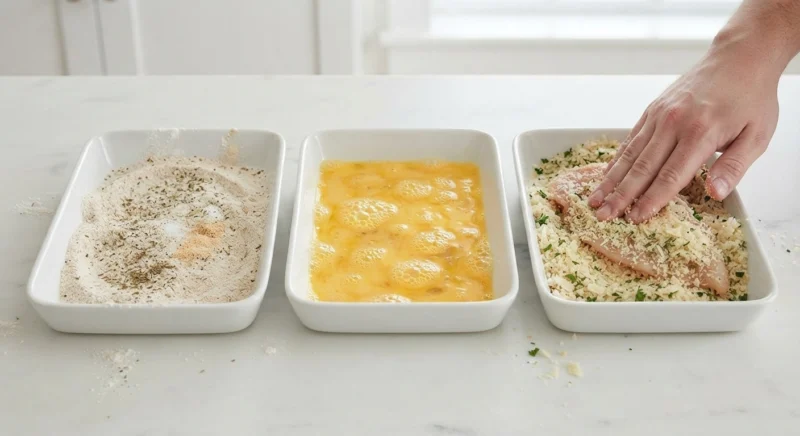
Arrange three shallow dishes from left to right.
Dish 1: Flour
Add:
- flour
- a little salt
- black pepper
Dish 2: Egg
Whisk together:
- eggs
- milk or water
Whisk until the mixture is completely combined.
Dish 3: Breadcrumbs
Combine:
- breadcrumbs
- Parmesan
- Italian seasoning
- garlic powder
- paprika
- salt
- black pepper
Mix thoroughly.
The three-stage system is:
flour → egg → breadcrumbs
This order is important.
Why Do We Use Flour First?
The flour creates a dry surface that helps the egg adhere.
If you skip the flour, the egg may slide off the chicken instead of forming an even layer.
That means the breadcrumbs may not adhere properly either.
Think of the flour as the foundation.
Why Do We Use Egg?
The egg acts like an edible adhesive.
It creates a moist surface that allows the breadcrumbs to stick.
Whisk the eggs thoroughly so that there are no large pieces of egg white remaining.
Why Add Parmesan to the Breadcrumbs?
Parmesan adds saltiness, savory flavor and additional browning.
It also makes the crust taste more substantial.
However, do not use an excessive amount.
Too much cheese can cause the crust to brown too quickly.
The Parmesan should support the breadcrumbs, not replace them.
Step 6: Bread the Chicken
Take one seasoned chicken cutlet.
First, place it into the flour.
Turn it over and coat both sides.
Shake off the excess flour.
This is important.
You do not want a thick layer of loose flour trapped underneath the crust.
Next, place the chicken into the egg mixture.
Turn it over so the entire surface is coated.
Allow excess egg to drip back into the bowl.
Finally, place the chicken into the breadcrumb mixture.
Press the breadcrumbs gently onto both sides.
Do not simply sprinkle breadcrumbs over the top.
You want them to make contact with the egg-coated surface.
Lift the finished cutlet and check for bare patches.
If you see an area without coating, gently add a little more breadcrumb mixture.
Place the breaded cutlet on a clean plate or rack.
Repeat with the remaining chicken.
A Very Important Breading Tip
Keep one hand for the dry ingredients and one hand for the wet ingredient.
For example:
- left hand: flour and breadcrumbs
- right hand: egg
This prevents your fingers from becoming covered in a giant mass of flour, egg and breadcrumbs.
It sounds like a small detail, but it makes the process much cleaner.
Step 7: Let the Breaded Chicken Rest
After breading the chicken, let the cutlets rest for about 5–10 minutes.
This is optional, but helpful.
The short resting period gives the coating time to hydrate slightly and adhere to the chicken.
It can reduce the chance of the crust separating when the cutlet enters the pan.
While the chicken rests, prepare the skillet.
Step 8: Heat the Oil
Place a large heavy skillet over medium to medium-high heat.
Add enough neutral oil to cover the bottom with a shallow layer.
Allow the oil to heat.
The ideal frying temperature is roughly 350°F to 375°F (175°C to 190°C).
If you have a thermometer, use it.
If you do not, you can test the oil by dropping in a tiny amount of breadcrumb mixture.
It should immediately begin to sizzle.
You want active bubbling around the crumbs, but not violent smoking.
What Happens If the Oil Is Too Cold?
This is one of the most common problems.
The chicken enters the pan and barely sizzles.
The coating absorbs oil.
Instead of becoming crisp, it becomes heavy and greasy.
The chicken may also take longer to brown, which means it stays in the oil longer.
That is exactly what you do not want.
What Happens If the Oil Is Too Hot?
The breadcrumbs may become dark brown very quickly.
Meanwhile, the center of the chicken may still be undercooked.
If this happens, lower the heat.
The goal is not maximum heat.
The goal is controlled heat.
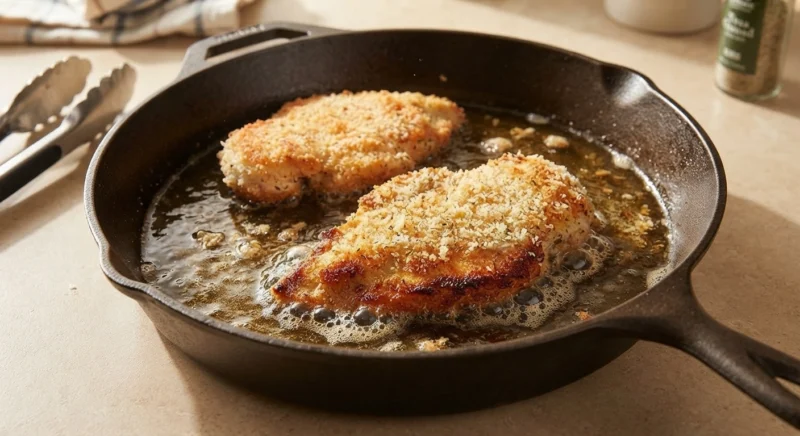
Step 9: Fry the Chicken Cutlets
Carefully place the breaded cutlets into the hot oil.
Do not drop them into the pan.
Lower them away from you to reduce the chance of hot oil splashing toward your hands.
Do not overcrowd the skillet.
If the pan is too crowded, the temperature of the oil can drop dramatically.
Depending on the size of your skillet, you may need to cook the cutlets in batches.
You should hear a steady, satisfying sizzle immediately.
Step 10: Cook the First Side
Cook the first side for approximately 2–4 minutes, depending on thickness and temperature.
Do not constantly move the chicken.
Let the crust make contact with the hot pan.
You are looking for a deep golden-brown color.
When the edges begin to look crisp and the underside is golden, carefully turn the cutlet.
Use tongs rather than a fork.
A fork can puncture the chicken and release juices.
Step 11: Cook the Second Side
Cook the second side for another 2–4 minutes.
Again, exact timing depends on thickness.
The crust should become golden brown and crisp.
The chicken should feel firm but not hard.
Do not rely on color alone to determine whether the chicken is cooked.
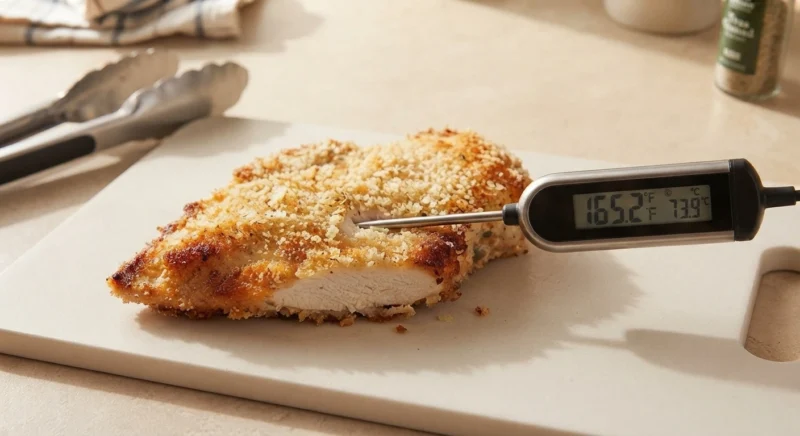
The most reliable method is to check the internal temperature with an instant-read thermometer.
The thickest part should reach 165°F (74°C) for chicken.
Insert the thermometer horizontally into the thickest portion so that the tip reaches the center.
Step 12: Transfer to a Wire Rack
When the chicken is finished, transfer each cutlet to a wire rack positioned over a baking sheet.
Do not immediately stack the cutlets.
Do not cover them tightly with foil.
Both actions can trap steam.
Steam is the enemy of crispy breading.
Allow the cutlets to rest for a few minutes.
The interior juices will redistribute while the exterior remains exposed to air.
How to Keep Chicken Cutlets Crispy
The biggest enemy of crispiness is moisture.
Here are the most important rules.
Do not stack hot cutlets
Stacking traps steam.
Do not cover immediately
Covering creates condensation.
Use a wire rack
Air can circulate around the entire cutlet.
Do not overcrowd the pan
Overcrowding lowers the oil temperature.
Serve soon after cooking
Chicken cutlets are at their best shortly after frying.
How Do You Know When Chicken Cutlets Are Done?
There are several signs.
The crust should be:
- golden brown
- crisp
- firmly attached
- evenly cooked
The chicken should be:
- firm but not hard
- opaque in the center
- juicy rather than dry
But the most reliable test is temperature.
For chicken, the thickest portion should reach 165°F (74°C).
A thermometer removes the guesswork.
This is especially useful for beginners because cooking time varies depending on the thickness of the cutlets, the temperature of the oil and the type of pan you use.
Why Thin Chicken Cooks So Quickly
Chicken cutlets are thin, so heat travels through them quickly.
That is why this recipe can be cooked in minutes rather than requiring a long oven roasting time.
However, fast cooking does not mean you should use extreme heat.
The chicken needs enough time for the center to cook while the breading develops a deep golden crust.
Moderate, controlled heat gives you the best balance.
Common Mistake: Making the Cutlets Too Thick
If the chicken remains thick in the center, the breading can become very dark before the meat reaches the desired temperature.
The solution is simple:
Flatten the chicken more evenly before breading.
You do not need perfectly identical pieces.
You simply want to eliminate major differences in thickness.
Common Mistake: Not Seasoning the Chicken
Breadcrumbs can be delicious, but the chicken itself also needs seasoning.
If you season only the breading, the interior can taste bland.
Season both sides of the meat before breading.
Common Mistake: Using Wet Breadcrumbs
Breadcrumbs need to remain relatively dry before they reach the chicken.
Do not mix the breadcrumbs with egg.
The correct sequence is:
chicken → flour → egg → breadcrumbs
Keeping the breadcrumb bowl dry helps maintain a light, crisp coating.
Common Mistake: Pressing Too Hard With the Meat Mallet
Flattening the chicken is useful.
Destroying its texture is not.
Use moderate pressure.
Start from the center and work outward.
If you pound aggressively, the chicken can become uneven and almost paste-like around the edges.
Common Mistake: Moving the Chicken Constantly
Once the cutlet enters the skillet, leave it alone for a while.
If you move it repeatedly, the breading has less opportunity to form a stable crust.
Let the pan do the work.
Common Mistake: Turning the Chicken Too Early
If the crust sticks strongly to the pan when you try to turn it, it may not be ready.
A properly browned crust usually releases more easily.
Use a thin spatula or tongs and turn the chicken carefully.
Common Mistake: Overcrowding the Pan
This is one of the easiest ways to lose crispiness.
Every piece of cold chicken lowers the temperature of the oil.
If you put too many cutlets into the skillet at once, the oil temperature can fall enough to produce greasy breading.
Give the chicken space.
Cook in batches if necessary.
Common Mistake: Using Butter as the Only Frying Fat
Butter tastes excellent with chicken, but it is not the best choice for frying at relatively high heat because its milk solids can brown or burn.
For frying, use a neutral oil.
If you want buttery flavor, add a little butter near the end of cooking or use it in a sauce.
Crispy Chicken Cutlets With Lemon
One of the easiest ways to finish these cutlets is with fresh lemon.
After the chicken is cooked, squeeze a small amount of fresh lemon juice over the cutlets immediately before serving.
Do not soak the chicken.
A light squeeze adds acidity that balances the richness of the fried coating.
You can also serve lemon wedges on the side.
Crispy Chicken Cutlets With Garlic Butter
For a richer variation, make a quick garlic butter.
Melt a small amount of butter in a separate pan.
Add minced garlic and cook briefly.
Remove from the heat before the garlic becomes dark.
Add chopped parsley and a small squeeze of lemon.
Serve the sauce lightly alongside the chicken.
Do not pour a large amount of sauce directly over the crispy coating unless you want a softer crust.
Crispy Chicken Cutlets With Parmesan
The basic recipe already includes Parmesan in the breadcrumb mixture.
For a stronger Parmesan flavor, increase the amount slightly.
You can also finish the cooked cutlets with finely grated Parmesan and fresh parsley.
This works particularly well when serving the chicken with pasta or a simple green salad.
Italian-Style Chicken Cutlets
For an Italian-inspired version, add:
- Italian seasoning
- extra Parmesan
- garlic powder
- black pepper
Serve with lemon wedges and a simple tomato salad.
You can also serve the cutlets with pasta and tomato sauce, but keep the sauce beside the chicken rather than pouring it over the crust if you want maximum crispiness.
Chicken Cutlets With a Simple Salad
Crispy chicken is rich enough that it benefits from something fresh alongside it.
A simple salad of:
- lettuce
- tomato
- cucumber
- red onion
- lemon
- olive oil
creates a good contrast.
The crisp vegetables provide freshness while the lemon dressing cuts through the richness of the fried chicken.
Chicken Cutlets With Potatoes
For a classic comfort-food dinner, serve the chicken with roasted potatoes.
You can also serve them with mashed potatoes.
If you choose mashed potatoes, consider adding a fresh vegetable or salad so the meal does not become too heavy.
Chicken Cutlets With Pasta
Thin crispy chicken pairs especially well with pasta.
A simple pasta with olive oil, garlic, Parmesan and lemon is enough.
You do not need a complicated sauce.
The chicken provides the main flavor and texture.
How to Make Extra-Crispy Chicken Cutlets
If you want an especially crunchy crust, there are several things you can do.
Use coarse breadcrumbs
Coarser breadcrumbs create more texture.
Press the coating firmly
Make sure the breadcrumbs adhere well.
Keep the oil hot
Avoid letting the pan temperature collapse.
Cook in batches
This is often more important than using a higher burner setting.
Use a wire rack
Prevent steam from softening the bottom.
Can You Use Panko Breadcrumbs?
Yes.
Panko creates a particularly light and crunchy crust.
You can replace some or all of the regular breadcrumbs with panko.
A mixture of regular breadcrumbs and panko gives you a balance between coverage and crunch.
For example:
- ¾ cup regular breadcrumbs
- ¾ cup panko
works very well.
Can You Bake Chicken Cutlets Instead?
Yes, although the texture will be somewhat different.
Pan-frying produces the most traditional crisp crust.
For a baked version, arrange the breaded cutlets on a lightly oiled baking sheet or rack.
Lightly spray or brush the coating with oil.
Bake in a hot oven until golden and the chicken reaches 165°F (74°C).
A wire rack placed over a baking sheet is especially useful because hot air can circulate underneath.
However, if your primary goal is the crispiest possible crust, shallow pan-frying is usually the better choice.
Can You Make Them in an Air Fryer?
Yes.
Air frying can produce a very crisp exterior with less oil.
Lightly spray the breaded chicken with oil before cooking.
Arrange the cutlets in a single layer without overlapping.
Cook according to your air fryer’s instructions and verify the chicken reaches 165°F (74°C).
Because air fryers vary considerably, use the cooking time as a guide rather than an absolute rule.
Can You Prepare the Chicken Ahead of Time?
You can prepare the chicken and breading components in advance.
However, breaded raw chicken should not sit uncovered at room temperature.
If you need to prepare ahead, keep the breaded cutlets refrigerated and cook them within an appropriate food-safe timeframe.
For the best crust, cooking soon after breading is preferable.
Can You Freeze Crispy Chicken Cutlets?
Yes.
Cooked chicken cutlets can be frozen.
Allow them to cool completely before freezing.
Place parchment between individual pieces so they do not freeze together.
Store them in an airtight freezer-safe container or bag.
For the best quality, use them within a reasonable period rather than keeping them frozen indefinitely.
How to Reheat Chicken Cutlets Without Making Them Soggy
Avoid the microwave if crispiness is important.
A microwave heats the moisture inside the chicken and can soften the crust.
Instead, reheat the cutlets in:
- a hot oven
- toaster oven
- air fryer
A wire rack is helpful in the oven because it allows hot air to circulate underneath.
Heat until the chicken is hot throughout.
Why the Microwave Is Not Ideal
The microwave is excellent for speed, but not for preserving crisp breading.
The water inside the chicken turns into steam.
That steam migrates toward the coating.
The result is usually a softer crust.
If you only need to warm the chicken quickly, the microwave works.
If you want to recreate the original texture, use dry heat.
Food Safety When Handling Raw Chicken
Raw chicken requires careful handling.
Wash your hands thoroughly with soap and water after handling raw chicken.
Keep raw chicken separate from ready-to-eat foods.
Use a clean cutting board and clean utensils.
Do not place cooked chicken back onto the plate that held the raw chicken unless the plate has been washed first.
And remember that visual appearance alone is not a reliable way to determine whether chicken is fully cooked.
Use a thermometer.
A Simple Workflow for Beginners
If you are making chicken cutlets for the first time, do not try to do everything simultaneously.
Follow this sequence:
First
Prepare and flatten all the chicken.
Second
Season all the cutlets.
Third
Set up the flour, egg and breadcrumb dishes.
Fourth
Bread every cutlet.
Fifth
Heat the skillet and oil.
Sixth
Cook the cutlets in batches.
Seventh
Transfer finished chicken to a wire rack.
Finally
Serve immediately with lemon or your preferred sauce.
This workflow is much less stressful than trying to bread one piece while another piece is already burning in the pan.
How to Tell If Your Oil Is Ready Without a Thermometer
A thermometer is the most accurate method.
But if you do not have one, use a small amount of breadcrumb mixture.
Drop a few crumbs into the oil.
If they immediately begin to bubble and sizzle actively, the oil is probably ready.
If they sit quietly in the oil, it is too cool.
If they darken almost immediately or the oil begins smoking, the pan is too hot.
Never use your fingers to test hot oil.
What Does Properly Fried Chicken Sound Like?
Experienced cooks often use sound as one of their clues.
When a breaded cutlet enters properly heated oil, you should hear a clear, active sizzle.
As moisture leaves the chicken, the sound may gradually change.
A completely silent pan is a warning that the oil is too cool.
Extremely aggressive popping can indicate excessive moisture or excessively hot oil.
You do not need to become an expert at listening to oil.
Just learn to recognize the basic difference between steady sizzling and almost no activity.
Why the Crust Sometimes Falls Off
There are several possible reasons.
The chicken was too wet
Pat the chicken dry before breading.
The flour layer was too thick
Shake off excess flour.
The egg did not cover the surface
Make sure the entire piece is coated.
The breadcrumbs were not pressed on
Gently press them into the egg coating.
The chicken was moved too much during cooking
Allow the crust to set before turning.
The oil temperature was too low
Low temperature can produce a weak, greasy coating.
Why Your Chicken Cutlets May Be Greasy
Usually, the biggest culprit is oil temperature.
If the oil is not hot enough, the breading absorbs oil.
Another cause is overcrowding.
Adding too many cold cutlets to the pan causes the oil temperature to drop.
A third possibility is cooking the chicken for too long.
Because cutlets are thin, they should cook relatively quickly.
Why Your Breadcrumbs May Burn
If the coating becomes dark very quickly, reduce the heat.
Remember that Parmesan and breadcrumbs can brown faster than the chicken itself.
If the outside is becoming dark before the inside is cooked, the cutlets may also be too thick.
Flatten them more evenly next time.
The Most Important Technique: Control the Heat
Many beginners think that high heat automatically creates crisp food.
It does not.
High heat can create burnt food.
Crispness comes from removing moisture from the surface while creating controlled browning.
That requires the right temperature and enough time.
For chicken cutlets, medium to medium-high heat is generally much more useful than turning the burner to maximum.
A Beginner’s Visual Guide
When you put the chicken into the skillet:
Immediately:
You should hear a steady sizzle.
After about 1 minute:
The coating should begin to firm up.
After several minutes:
The underside should become golden brown.
When turning:
The crust should feel attached rather than sliding around.
At the end:
The chicken should be golden and crisp, and the thickest portion should reach 165°F (74°C).
This is more useful than blindly following a timer.
Serving the Chicken Cutlets
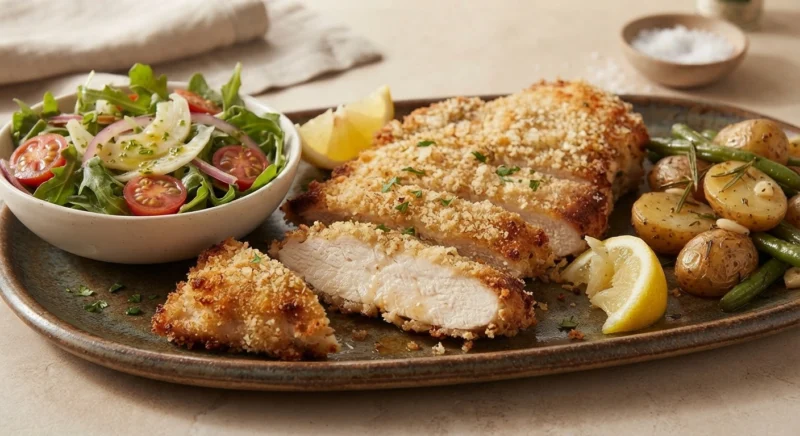
Serve the cutlets while they are hot and crisp.
A simple presentation works beautifully.
Place one or two cutlets on a plate.
Add lemon wedges.
Add a small salad or roasted vegetables.
Finish with fresh parsley if desired.
If serving a sauce, keep it on the side or spoon it around the chicken rather than covering the crust.
That way, every bite can remain crisp.
How to Slice Chicken Cutlets
Because these cutlets are already thin, you usually do not need to slice them before serving.
If serving them over salad or pasta, you can cut them into strips.
Use a sharp chef’s knife.
Let the chicken rest briefly first.
Then make clean diagonal slices across the cutlet.
A sharp knife creates attractive pieces without crushing the crispy crust.
Frequently Asked Questions
How thin should chicken cutlets be?
Around ¼ to ½ inch is a practical range.
The most important thing is consistent thickness rather than achieving an exact measurement.
Can I use chicken thighs?
Yes.
Boneless, skinless chicken thighs can be used, although they have a different texture and flavor from breast meat.
They may also require slightly different cooking times.
Can I use only panko?
Yes.
Panko creates a very crunchy coating.
For a more traditional texture, you can combine panko with regular breadcrumbs.
Why is my chicken dry?
The most common reasons are overcooking and excessively thin pieces.
Use an instant-read thermometer and remove the chicken when the thickest portion reaches the appropriate safe temperature.
Can I use olive oil?
A mild olive oil can work for shallow frying, but a neutral oil is often easier for beginners because it has a more neutral flavor.
Choose an oil appropriate for the cooking temperature.
Do I have to use Parmesan?
No.
You can omit it.
The breadcrumbs will still create a crisp crust.
If you remove the Parmesan, you may want to add a little additional seasoning to the breadcrumb mixture.
Can I make chicken cutlets without eggs?
Yes.
There are several alternatives, including milk-based or other binding mixtures.
However, eggs provide an especially reliable coating for this recipe.
Why should I use a wire rack?
A wire rack prevents the bottom of the chicken from sitting directly against a flat surface.
This allows steam to escape and helps preserve the crisp crust.
Can I stack the cooked chicken?
It is better not to.
Stacking traps steam and can soften the coating.
If you need to hold several cooked cutlets, keep them separated on a rack.
The Complete Crispy Chicken Cutlets Recipe
Ingredients
Chicken
- 2 large boneless, skinless chicken breasts
- 1 teaspoon kosher salt
- ½ teaspoon black pepper
- ½ teaspoon garlic powder
- ½ teaspoon paprika
Breading
- 1 cup all-purpose flour
- 2 large eggs
- 2 tablespoons milk or water
- 1½ cups breadcrumbs
- ½ cup finely grated Parmesan
- 1 teaspoon Italian seasoning
- ½ teaspoon garlic powder
- ½ teaspoon paprika
- ½ teaspoon salt
- ¼ teaspoon black pepper
For frying
- Neutral cooking oil
To serve
- Lemon wedges
- Fresh parsley
- Salad or vegetables of choice
Instructions
1. Prepare the chicken
Pat the chicken breasts dry.
Slice each breast horizontally into thinner cutlets.
Flatten the pieces gently between sheets of plastic wrap or parchment until they are approximately ¼–½ inch thick.
2. Season
Season both sides with salt, black pepper, garlic powder and paprika.
3. Prepare the breading station
Place flour in one shallow dish.
Whisk eggs with milk or water in the second.
Combine breadcrumbs, Parmesan, Italian seasoning, garlic powder, paprika, salt and pepper in the third.
4. Bread the chicken
Coat each cutlet in flour.
Shake off excess.
Dip into the egg mixture.
Allow excess egg to drip away.
Press firmly into the breadcrumb mixture until completely coated.
5. Rest
Allow the breaded chicken to rest for 5–10 minutes while the oil heats.
6. Heat the oil
Heat a shallow layer of neutral oil in a heavy skillet over medium to medium-high heat.
Aim for approximately 350–375°F (175–190°C).
7. Fry
Carefully place the chicken into the hot oil without overcrowding the pan.
Cook approximately 2–4 minutes on the first side, until golden brown.
Turn carefully.
Cook another 2–4 minutes, or until golden and the chicken reaches 165°F (74°C) internally.
8. Drain
Transfer the cooked chicken to a wire rack.
Do not stack or cover immediately.
9. Serve
Serve hot with lemon wedges, fresh herbs, salad, vegetables or your preferred side dish.
Final Tips for Perfect Crispy Chicken Cutlets
If you remember only a few things from this recipe, remember these:
Keep the chicken evenly thin.
Season the meat as well as the breading.
Pat the chicken dry before breading.
Use the flour → egg → breadcrumbs sequence.
Press the breadcrumbs onto the chicken.
Keep the oil hot but controlled.
Do not overcrowd the skillet.
Use a thermometer rather than guessing when the chicken is done.
Transfer cooked cutlets to a wire rack instead of a flat plate.
Serve them soon after cooking for the best texture.
The beauty of crispy chicken cutlets is that they do not require complicated culinary techniques. They simply reward attention to a handful of fundamentals: even thickness, proper seasoning, a well-adhered coating, controlled frying temperature and correct cooking temperature.
Once you understand those principles, you can use the same method with different seasonings, breadcrumbs, sauces and side dishes to create many variations without changing the basic technique.
The finished result should be exactly what the name promises: a deeply golden, crunchy exterior surrounding tender, juicy chicken.
https://ask.fsis.usda.gov/article/Is-it-safe-to-eat-raw-chicken