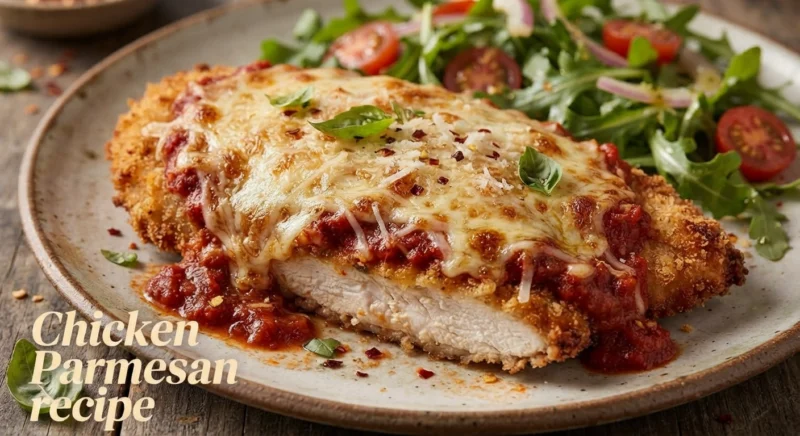
Chicken Parmesan
Chicken Parmesan is one of those dishes that looks impressive on the plate but is actually very approachable once you understand the technique.
A properly made Chicken Parmesan has several textures working together: a thin, tender piece of chicken, a crisp golden breadcrumb coating, bright tomato sauce, and melted cheese that forms a bubbling, lightly browned layer on top. The chicken should remain juicy, while the crust should stay crisp enough to provide contrast against the sauce and cheese.
The secret is not a complicated ingredient list. It is how you handle each stage of the cooking process.
The chicken needs to be sliced to an even thickness. The seasoning needs to reach the chicken itself rather than only the breading. The coating needs to adhere properly. The oil needs to be hot enough to brown the crust without burning it. And when the sauce and cheese are added, they should be used in a way that does not turn the entire crust soggy.
This classic Chicken Parmesan recipe walks through all of those details carefully, including what you should look for, what can go wrong, and how to fix common problems.
What Is Chicken Parmesan?
Chicken Parmesan, also called Chicken Parmigiana or Chicken Parm, is a breaded chicken dish traditionally served with tomato sauce and melted cheese.
The basic method is straightforward:
- Slice chicken breasts into thin cutlets.
- Season the chicken.
- Coat the chicken in flour, egg, and breadcrumbs.
- Pan-fry the breaded chicken until golden and crisp.
- Add tomato sauce and cheese.
- Bake or broil until the cheese melts and lightly browns.
- Serve immediately.
The important thing is that the dish has two distinct cooking stages.
The first stage creates the crisp chicken crust.
The second stage combines the crust with tomato sauce and cheese.
If you put too much sauce on the chicken or bake it for too long, the crust can become soft. If you skip the initial frying, the dish can taste more like baked breaded chicken than classic Chicken Parmesan.
Why This Classic Chicken Parmesan Recipe Works
There are many Chicken Parmesan recipes, but the best results usually come from paying attention to a few basic principles.
Thin chicken cooks evenly
A whole chicken breast is too thick for this preparation. By cutting it horizontally into thinner pieces, you create cutlets that cook quickly and evenly.
Thin chicken also gives you a better balance between chicken and crust. You do not want a thick piece of chicken hidden underneath a thin layer of breading.
Even thickness prevents dry edges
If one part of the chicken is very thin and another is thick, the thin part can become dry before the thick part reaches the correct temperature.
Gently flattening the cutlets solves this problem.
The goal is not to turn the chicken into paper. You want a cutlet approximately ¼ to ½ inch thick.
Seasoning happens in layers
The chicken itself should be seasoned.
The flour should be lightly seasoned.
The breadcrumb mixture should also be seasoned.
This creates much better flavor than relying entirely on the tomato sauce.
Frying creates the characteristic crust
Pan-frying in a shallow layer of oil gives the breadcrumbs direct contact with hot fat. This creates the golden-brown crust that makes Chicken Parmesan so satisfying.
You do not need to deep-fry the chicken.
Sauce should be used strategically
Tomato sauce is essential, but too much sauce can quickly soften the crust.
A moderate layer is enough.
You want sauce and cheese to complement the chicken rather than completely bury it.
The final baking stage should be short
The chicken is already cooked before the cheese is added.
The oven is primarily there to heat the sauce, melt the cheese, and finish the dish.
That means you do not need to bake the Chicken Parmesan for a long time.
Ingredients for Classic Chicken Parmesan
This recipe makes approximately 4 servings.
For the Chicken
- 2 large boneless, skinless chicken breasts
- 1 teaspoon kosher salt
- ½ teaspoon freshly ground black pepper
- ½ teaspoon garlic powder
- ½ teaspoon paprika
For the Breading
- 1 cup all-purpose flour
- 2 large eggs
- 2 tablespoons milk or water
- 1½ cups plain breadcrumbs
- ½ cup finely grated Parmesan cheese
- 1 teaspoon dried Italian seasoning
- ½ teaspoon garlic powder
- ½ teaspoon paprika
- ½ teaspoon kosher salt
- ¼ teaspoon black pepper
You can use traditional plain breadcrumbs or finely ground Italian-style breadcrumbs.
For an especially crisp crust, panko breadcrumbs can be mixed with regular breadcrumbs.
For Frying
- Neutral cooking oil, such as vegetable, canola, sunflower, or another suitable high-heat oil
- Enough oil to create approximately a ⅛- to ¼-inch layer in the skillet
For the Sauce
- 2 cups good-quality tomato marinara sauce
You can use homemade tomato sauce or a prepared marinara sauce.
The sauce should have a balanced tomato flavor rather than being extremely sweet.
For the Cheese
- 1½ cups shredded low-moisture mozzarella
- ½ cup finely grated Parmesan cheese
Low-moisture mozzarella is particularly useful because it melts well without releasing excessive water.
For Serving
Optional:
- Fresh basil
- Fresh parsley
- Lemon wedges
- Cooked spaghetti
- Simple green salad
- Roasted vegetables
Equipment You Will Need
You do not need specialized equipment.
Useful tools include:
- Sharp chef’s knife
- Large cutting board
- Meat mallet or rolling pin
- Plastic wrap or parchment paper
- Three shallow dishes
- Large skillet
- Tongs
- Instant-read thermometer
- Wire rack
- Baking sheet
- Parchment paper or foil
- Oven-safe baking dish
A sharp knife is particularly important when preparing the chicken.
A dull knife tends to require more pressure, which makes it harder to control and increases the chance of uneven cuts.
Step 1: Prepare the Chicken
Start by removing the chicken breasts from their packaging.
Pat them thoroughly dry with paper towels.
Do not wash raw chicken.
Washing raw chicken does not make it safer and can spread raw poultry juices around the sink and surrounding surfaces.
Drying the surface is useful because excess moisture makes the chicken more difficult to slice cleanly and can interfere with seasoning and breading.
Place the chicken breast flat on your cutting board.
Before cutting, inspect it and remove any obvious pieces of excess fat or connective tissue.
Do not spend several minutes trying to make the breast look perfectly trimmed. Chicken Parmesan is a practical home-cooked dish, not a competition in decorative trimming.
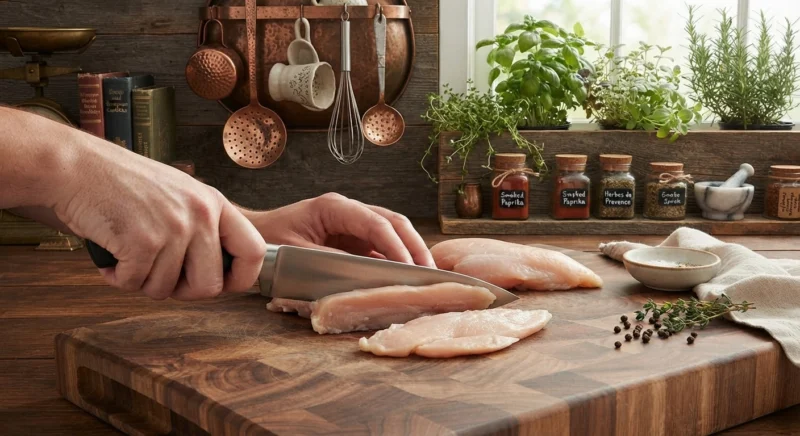
Step 2: Slice the Chicken Into Cutlets
This is one of the most important steps.
Place one chicken breast flat on the cutting board.
Hold your knife parallel to the cutting board.
Using your non-cutting hand to stabilize the chicken, carefully slice horizontally through the breast.
The goal is to divide the thick breast into two thinner pieces.
You should end up with approximately four cutlets from two large chicken breasts.
Knife Technique
Do not try to force the knife through the chicken in one aggressive motion.
Instead, use controlled, smooth strokes.
Keep your fingers curled slightly on the hand holding the chicken so that your fingertips are not directly in the path of the knife.
Keep the blade stable and work slowly.
If the breast is difficult to slice evenly, you can place it in the freezer for approximately 15–20 minutes first.
You are not trying to freeze it solid.
You simply want the meat to become slightly firmer.
Firm chicken is often easier to slice into even pieces.
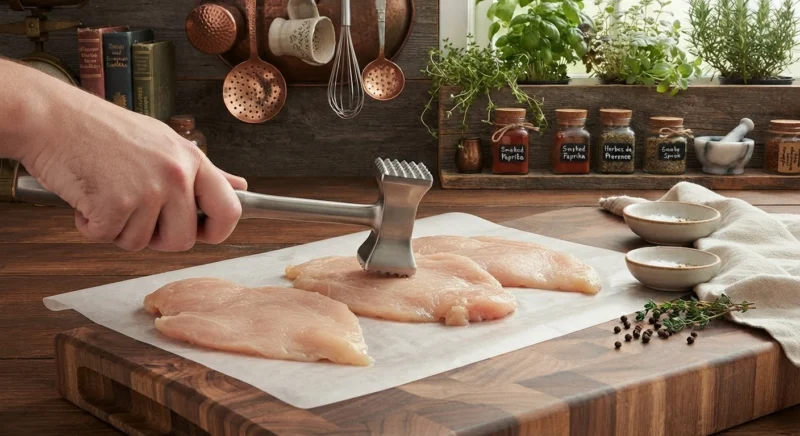
Step 3: Flatten the Chicken Evenly
Place each chicken cutlet between two sheets of parchment paper or plastic wrap.
Gently pound the thickest areas with a meat mallet.
If you do not have a meat mallet, the bottom of a small heavy skillet can work.
Do not hit the chicken as hard as possible.
The goal is even thickness, not maximum thinness.
Aim for approximately ¼ to ½ inch thickness.
Look at the cutlet from the side.
If one end is extremely thin and another is much thicker, continue gently flattening the thicker area.
Why This Matters
An even cutlet gives you several advantages.
It cooks more predictably.
It is easier to bread.
It gives you a consistent crust-to-chicken ratio.
Most importantly, it reduces the chance that one part of the chicken will be dry while another part is still undercooked.
This is one of the most useful lessons for cooking chicken in general:
Uniform thickness is more important than exact thickness.
Step 4: Season the Chicken
Combine the kosher salt, black pepper, garlic powder, and paprika.
Season both sides of each chicken cutlet.
Do not be afraid to season the chicken itself.
The breading and sauce contain flavor, but the chicken should not taste bland underneath them.
Let the seasoned chicken sit for a few minutes while you prepare the breading station.
You do not need to marinate it for hours.
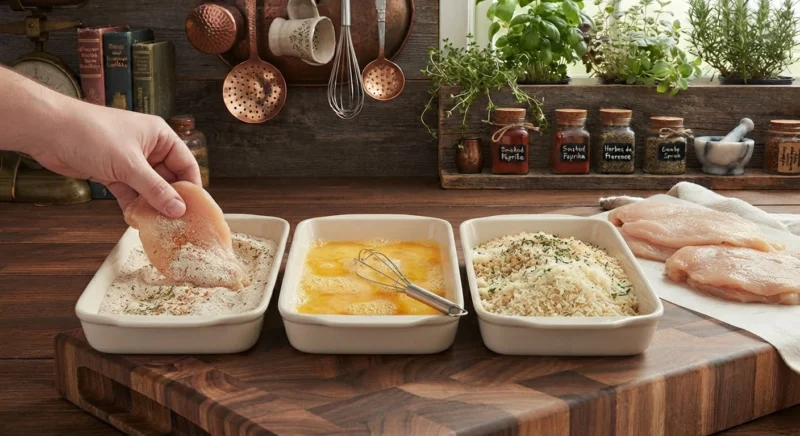
Step 5: Prepare the Breading Station
Arrange three shallow dishes.
Dish 1: Flour
Add the flour.
Season it lightly with a pinch of salt and pepper.
Dish 2: Egg
Crack the eggs into the second dish.
Add the milk or water.
Whisk until completely combined.
The mixture should look uniform, with no large streaks of egg white.
Dish 3: Breadcrumbs
Combine:
- breadcrumbs
- Parmesan
- Italian seasoning
- garlic powder
- paprika
- salt
- black pepper
Mix thoroughly.
This is your crispy Parmesan coating.
Why Does Chicken Need Three Coating Stages?
Each stage has a specific job.
Flour
The flour creates a dry surface that helps the egg adhere.
Without it, the egg can slide off the moist chicken.
Egg
The egg acts like a glue.
It creates the sticky surface needed for the breadcrumbs to adhere.
Breadcrumbs
The breadcrumbs create the crust.
The Parmesan adds savory flavor and helps the coating develop a deeper golden color.
Once you understand what each layer does, the breading process becomes much easier to troubleshoot.
If breadcrumbs fall off, ask yourself:
Was the chicken too wet?
Was the flour missing?
Was the egg coating too thin?
Did I press the breadcrumbs onto the chicken?
Usually, the problem is somewhere in this sequence.
Step 6: Bread the Chicken
Take one seasoned chicken cutlet.
Place it into the flour.
Turn it over and coat both sides.
Shake off the excess flour.
You want a thin, even coating.
Do not leave a thick layer of loose flour on the chicken.
Next, place the chicken into the beaten egg.
Turn it so both sides are covered.
Allow excess egg to drip back into the dish.
Finally, place the chicken into the breadcrumb mixture.
Press the breadcrumbs gently onto both sides.
Do not simply sprinkle breadcrumbs over the top.
The pressure helps the coating attach firmly to the egg layer.
Transfer the breaded cutlet to a clean plate or wire rack.
Repeat with the remaining chicken.
A Simple Trick for Cleaner Breading
Use one hand for the dry ingredients and one hand for the wet ingredient.
For example:
- Left hand: flour and breadcrumbs
- Right hand: egg
This prevents your fingers from becoming coated in a thick mixture of flour, egg, and breadcrumbs.
You can also use tongs for part of the process.
Step 7: Let the Breaded Chicken Rest
Let the breaded chicken rest for approximately 5–10 minutes before frying.
This small step is helpful because the coating has time to settle against the chicken.
If you immediately move the chicken around aggressively, some of the breading can loosen.
While the chicken rests, start heating the skillet.
Step 8: Heat the Oil
Choose a large skillet that gives the chicken enough room.
Add enough neutral oil to create a shallow layer approximately ⅛ to ¼ inch deep.
Heat the oil over medium to medium-high heat.
The ideal frying temperature is approximately 350–375°F (175–190°C).
If you have an instant-read or cooking thermometer that can safely measure the oil, use it.
If you do not have one, place a small breadcrumb into the oil.
It should immediately begin sizzling.
The oil should not be smoking heavily.
What If the Oil Is Too Cool?
The breading absorbs oil instead of quickly forming a crust.
The result can be:
- greasy chicken
- pale breadcrumbs
- soft crust
- longer cooking time
What If the Oil Is Too Hot?
The breadcrumbs can become dark or burnt before the chicken is properly cooked.
This is particularly easy to do because Parmesan and fine breadcrumbs brown relatively quickly.
Moderate, controlled heat is better than maximum heat.
Step 9: Fry the Chicken
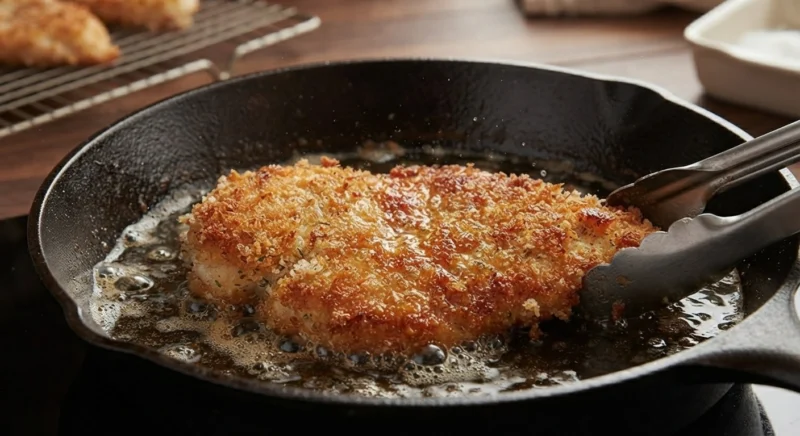
Carefully place the breaded chicken cutlets into the hot oil.
Lower them away from yourself to reduce the chance of splashing hot oil.
Do not overcrowd the skillet.
Depending on the size of your pan, you may need to fry the chicken in batches.
The cutlets should have enough room around them for the oil to remain hot.
You should hear a steady, active sizzling sound.
It should not be completely silent.
It also should not sound violently aggressive.
That sound is one of the easiest ways to learn how to control shallow frying.
Step 10: Fry the First Side
Cook the first side for approximately 2–4 minutes.
Do not move the chicken constantly.
When the coating first enters the oil, it is fragile.
Moving it around can cause the breading to separate.
Allow the first side to develop a crust.
Look at the edges.
They should gradually become golden brown.
When the underside is deep golden and crisp, carefully turn the cutlet using tongs.
Step 11: Fry the Second Side
Cook the second side for another approximately 2–4 minutes.
The exact cooking time depends on the thickness of the cutlets and the temperature of the oil.
Do not rely entirely on time.
Use visual and temperature cues.
The crust should be:
- golden brown
- crisp
- firmly attached
- not burnt
The chicken itself should reach a safe internal temperature of 165°F (74°C).
Insert the thermometer into the thickest part of the chicken rather than into the crust.
If the chicken has reached the correct internal temperature and the crust is beautifully browned, remove it from the skillet.
Step 12: Drain the Chicken Correctly
This is a surprisingly important detail.
Place the cooked chicken on a wire rack set over a baking sheet.
Do not immediately place it flat on a plate covered with paper towels if you want maximum crispness.
Why?
Because steam escapes from the hot chicken.
If the hot cutlet sits directly against a flat surface, the trapped steam can soften the underside of the crust.
A wire rack allows air to circulate underneath.
You can use paper towels briefly if needed, but a rack is better for maintaining crispness.
Step 13: Prepare the Chicken Parmesan for Baking
Preheat the oven to approximately 400°F (200°C).
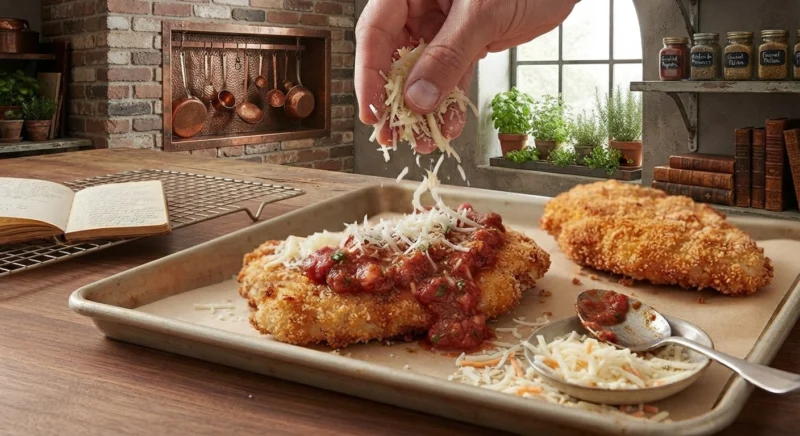
Arrange the fried chicken cutlets in a lightly oiled or parchment-lined baking dish or on a baking sheet.
Spoon a moderate amount of marinara sauce over each cutlet.
Do not completely bury the crust.
You want enough sauce to provide tomato flavor without turning the entire surface into a wet layer.
Then add shredded mozzarella.
Finish with grated Parmesan.
How Much Sauce Should You Use?
This is one of the easiest places to make a mistake.
It is tempting to pour a large amount of sauce over the chicken.
Don’t.
Chicken Parmesan should taste like chicken, crust, tomato sauce, and cheese working together.
The sauce should complement the chicken.
It should not turn the breading into a wet coating.
A few spoonfuls of sauce per cutlet is usually enough.
You can always serve additional warm marinara on the side.
Step 14: Bake Until the Cheese Melts
Place the prepared Chicken Parmesan into the preheated oven.
Bake for approximately 8–12 minutes, or until the cheese has melted and the dish is hot.
Because the chicken was already fried, you do not need a long baking period.
If you want a more browned cheese surface, switch to the broiler for the final 1–2 minutes.
Watch it carefully.
Cheese can move from beautifully browned to burnt surprisingly quickly under a broiler.
How to Know When Chicken Parmesan Is Ready
Look for several signs.
The cheese
It should be fully melted and bubbling around the edges.
A few golden-brown spots are desirable.
The sauce
It should be hot and gently bubbling.
The chicken
The chicken should remain firm but tender, and the internal temperature should be at least 165°F (74°C).
The crust
The exposed areas of crust should remain visibly golden.
If the entire surface has become pale and soft, you may have used too much sauce or baked it for too long.
Why Does Chicken Parmesan Sometimes Become Soggy?
This is probably the most common complaint about the dish.
There are several possible reasons.
Too Much Sauce
This is the most obvious problem.
The breading absorbs moisture from the tomato sauce.
Use a moderate amount.
Sauce Is Too Thin
A watery sauce contains more moisture that can migrate into the crust.
A thick, concentrated marinara works better.
Chicken Was Fried at Too Low a Temperature
If the oil is not hot enough, the breading absorbs more oil and does not develop a strong crisp structure.
Chicken Was Covered Immediately
Steam can soften the coating.
Let the fried chicken rest on a wire rack.
Too Much Baking
The longer the chicken sits underneath sauce and cheese in the oven, the more moisture has time to soften the crust.
Remember: the chicken is already cooked.
The final oven stage is mainly for melting the cheese.
How to Make Chicken Parmesan Extra Crispy
If crispiness is your priority, use these techniques.
Dry the chicken well
Moisture is the enemy of a crisp coating.
Flatten evenly
Thin, even cutlets cook quickly.
Press the breadcrumbs onto the chicken
This creates a stronger crust.
Let the breaded chicken rest
Give the coating several minutes to settle.
Maintain the oil temperature
Avoid adding too many cold cutlets to the skillet at once.
Do not overcrowd
Crowding lowers the oil temperature.
Use a wire rack
This prevents steam from softening the underside.
Use panko
For an especially crunchy crust, replace part or all of the regular breadcrumbs with panko.
Should You Use Panko or Regular Breadcrumbs?
Both work.
Regular breadcrumbs produce a finer, more traditional crust.
Panko produces a rougher and crunchier coating.
For a balance of crispness and structure, you can use:
- ¾ cup regular breadcrumbs
- ¾ cup panko
This gives you plenty of surface texture without creating an excessively thick crust.
Classic Chicken Parmesan vs. Crispy Chicken Cutlets
Chicken Parmesan and crispy chicken cutlets begin with a very similar technique.
Both use thin chicken breasts and a breadcrumb coating.
The difference comes later.
Crispy chicken cutlets are intended to remain crisp and are usually served without a heavy sauce layer.
Chicken Parmesan adds tomato sauce and cheese, followed by a short oven finish.
If you have already made our Crispy Chicken Cutlets Recipe, the breading and frying techniques will feel very familiar.
Chicken Parmesan simply takes that crispy cutlet and turns it into a complete baked dish.
If you want a simpler version without marinara and cheese, see our Crispy Chicken Cutlets recipe.
Common Chicken Parmesan Mistakes
Mistake 1: Using Whole Chicken Breasts
A thick chicken breast takes much longer to cook.
By the time the center is ready, the outside can become dry.
Solution: Slice the breasts into thin, even cutlets.
Mistake 2: Not Flattening Uneven Pieces
Even after slicing, some pieces may still be thicker than others.
Solution: Gently pound the thick areas until the cutlets are relatively uniform.
Mistake 3: Skipping Chicken Seasoning
Breadcrumbs can be delicious, but they cannot completely compensate for unseasoned chicken.
Solution: Season the chicken before breading.
Mistake 4: Skipping the Flour
Some people dip chicken directly into egg and then breadcrumbs.
The coating may still work, but the flour provides a useful dry layer that improves adhesion.
Solution: Use flour → egg → breadcrumbs.
Mistake 5: Not Pressing the Breadcrumbs
Simply rolling the chicken in breadcrumbs can leave loose areas.
Solution: Press the breadcrumbs gently but firmly onto both sides.
Mistake 6: Frying in Cold Oil
The crust absorbs too much oil.
Solution: Wait until the oil is properly heated before adding the chicken.
Mistake 7: Overcrowding the Pan
Too many cutlets reduce the oil temperature.
Solution: Fry in batches.
Mistake 8: Turning the Chicken Too Early
The crust needs time to form.
Solution: Let the first side cook undisturbed until the crust is properly browned.
Mistake 9: Using Too Much Sauce
This is one of the quickest ways to lose crispness.
Solution: Use a moderate layer and serve additional sauce on the side.
Mistake 10: Baking Too Long
Remember that the chicken is already cooked.
Solution: Bake only until the cheese is melted and bubbling.
How to Make Homemade Marinara for Chicken Parmesan
You can absolutely use prepared marinara.
But if you want to make your own, keep it simple.
A basic marinara can be made with:
- crushed tomatoes
- olive oil
- garlic
- onion
- salt
- black pepper
- dried oregano or basil
- fresh basil if available
The most important characteristic is consistency.
The sauce should be thick enough to sit on the chicken rather than immediately running off.
If your sauce is watery, simmer it uncovered for several minutes until some of the excess moisture evaporates.
Choosing the Right Mozzarella
For Chicken Parmesan, low-moisture mozzarella is often easier to work with than fresh mozzarella.
Fresh mozzarella contains considerably more water.
That moisture can make the surface of the chicken wetter.
Low-moisture mozzarella melts smoothly and browns nicely.
You can also combine mozzarella with Parmesan.
Mozzarella provides stretch and creaminess.
Parmesan contributes salty, nutty flavor and helps create a more flavorful browned surface.
Can You Make Chicken Parmesan Ahead?
Yes.
There are several stages where you can prepare the dish ahead.
Bread the Chicken Ahead
Breaded uncooked chicken can be refrigerated for a short period before frying.
Keep it covered and refrigerated.
Do not leave raw chicken sitting at room temperature.
Fry the Chicken Ahead
You can also fry the chicken earlier in the day.
Let it cool properly, refrigerate it, and then reheat it before adding sauce and cheese.
However, the freshest and crispiest result comes from frying and finishing the dish close to serving time.
Can You Freeze Chicken Parmesan?
Yes, but texture is affected.
The sauce and cheese introduce moisture, and freezing and reheating can soften the breading.
For the best freezer result, prepare and fry the chicken separately.
Cool it completely.
Freeze the fried cutlets individually.
Then reheat them until hot and crisp before adding sauce and cheese.
This gives you better texture than freezing a fully assembled Chicken Parmesan dish.
How to Reheat Chicken Parmesan
The oven is generally better than the microwave if you care about texture.
Preheat the oven to approximately 375°F (190°C).
Place the Chicken Parmesan on a baking sheet or oven-safe dish.
Heat until the center is hot and the cheese is melted.
If the crust has become soft, a short period under the broiler can help restore some surface crispness.
Watch carefully.
The goal is to brown the cheese, not burn it.
Can Chicken Parmesan Be Baked Instead of Fried?
Yes.
For a lighter preparation, you can bake the breaded chicken.
Place the breaded cutlets on a lightly oiled wire rack set over a baking sheet.
Lightly spray or brush the coating with oil.
Bake at approximately 425°F (220°C) until golden and cooked through, turning once if necessary.
Then add sauce and cheese and return the chicken to the oven until the cheese melts.
The baked version is convenient, but the fried version generally gives you a deeper, more classic crust.
Can You Make Chicken Parmesan in an Air Fryer?
Yes.
Bread the chicken using the same flour, egg, and breadcrumb process.
Lightly spray the breaded chicken with oil.
Place the cutlets in a single layer in the air fryer basket.
Cook according to your air fryer’s capacity and temperature recommendations, turning once.
The chicken should reach 165°F (74°C).
Then add sauce and cheese and return it briefly to the air fryer until the cheese melts.
Avoid adding sauce too early.
The breading needs time to become crisp first.
A Simple Side Dish Strategy
Chicken Parmesan is rich.
You do not necessarily need a complicated side dish.
Pasta
Spaghetti with a small amount of marinara is the classic choice.
Salad
A crisp green salad with a simple vinaigrette provides freshness and acidity.
Vegetables
Roasted broccoli, zucchini, green beans, or asparagus can balance the richness of the chicken.
Bread
A small piece of crusty bread is useful for the remaining tomato sauce.
Why Acid Helps Rich Foods
This is a useful cooking principle.
Chicken Parmesan contains several rich components:
- fried breadcrumbs
- cheese
- oil
- tomato sauce
A little acidity makes the dish feel lighter.
Tomatoes already provide acidity, which is one reason marinara works so well.
A simple salad with a vinegar-based dressing can provide another layer of contrast.
You do not need a complicated dressing.
Olive oil, vinegar or lemon juice, salt, and pepper are enough.
Knife Technique and Safety
Because this recipe begins with raw chicken, knife safety deserves attention.
Use a stable cutting board.
If your cutting board moves on the counter, place a damp kitchen towel underneath it.
Keep your knife sharp.
A sharp blade requires less force and gives you more control.
When slicing the chicken horizontally, keep your non-cutting hand above the chicken in a safe position rather than placing fingertips directly in front of the blade.
After preparing raw chicken, wash the cutting board, knife, and other surfaces that contacted the raw poultry with hot soapy water.
Do not use the same cutting board for ready-to-eat foods without washing it first.
How to Tell if Your Knife Is Sharp Enough
A properly sharpened chef’s knife should be able to cut through the chicken without excessive force.
You should be able to make controlled slices rather than repeatedly sawing aggressively.
If you find yourself pressing hard, the knife may need sharpening.
A good knife is not simply a luxury for professional cooks.
It is a control tool.
Understanding the Sounds of Frying
If you are new to shallow frying, sound can tell you a lot.
When the chicken enters properly heated oil, you should hear a steady sizzle.
If you hear almost nothing, the oil may be too cool.
If the oil is violently splattering and the breadcrumbs darken almost immediately, the heat may be too high.
As the chicken cooks, the sound often changes.
The moisture in the chicken gradually decreases, and the frying becomes somewhat quieter.
Learning these cues takes practice, but they become surprisingly useful.
What to Do If the Breadcrumbs Burn
If the breadcrumbs become dark before the chicken is cooked, reduce the heat.
Do not immediately assume the chicken needs more time.
The problem may simply be that the oil is too hot.
If you are frying multiple batches, check the oil between batches.
Loose breadcrumbs left in the skillet can continue to burn and make the next batch darker.
Use tongs or a slotted utensil to remove excessive crumbs before adding the next cutlets.
What to Do If the Chicken Is Greasy
Greasy Chicken Parmesan usually means one of three things:
- The oil was too cool.
- The pan was overcrowded.
- The chicken remained in the oil too long.
The solution is not simply to use less oil.
You need the oil to be hot enough to create a crust quickly.
A shallow layer of properly heated oil is preferable to allowing the chicken to slowly absorb oil.
What to Do If the Breading Falls Off
If the crust separates when you turn the chicken, check your breading process.
Make sure the chicken was dry before flouring.
Make sure the flour covered the surface evenly.
Make sure the egg covered the flour.
Press the breadcrumbs firmly onto the egg-coated chicken.
Finally, let the breaded chicken rest for several minutes before frying.
Once the chicken is in the oil, avoid unnecessary movement.
What to Do If the Chicken Is Dry
Dry Chicken Parmesan is usually caused by overcooking.
Thin cutlets cook quickly.
That is an advantage, but it also means you have less margin for error.
Use an instant-read thermometer.
Do not continue cooking simply because a recipe says “four minutes per side.”
Cooking times are estimates.
Thickness, pan temperature, oil temperature, and chicken size all affect cooking time.
The thermometer gives you a much more reliable answer.
What to Do If the Cheese Does Not Brown
If the cheese is melted but still pale, you can use the broiler for the final minute or two.
Position the dish appropriately under the broiler and watch continuously.
Do not walk away.
The difference between golden cheese and burnt cheese can happen very quickly.
What to Do If the Cheese Browns Too Quickly
Your oven or broiler may be too intense, or the dish may be positioned too close to the heating element.
Move it farther away from the broiler.
You can also finish the dish at a lower oven temperature.
Remember that the chicken is already cooked.
You only need to heat the sauce and melt the cheese.
Classic Chicken Parmesan Variations
The classic version is excellent on its own, but there are several easy variations.
Garlic Parmesan Chicken Parmesan
Add a small amount of garlic powder to the breadcrumb mixture.
You can also add finely grated fresh garlic to the marinara.
Avoid adding too much fresh garlic directly to the breadcrumbs because it can burn during frying.
Spicy Chicken Parmesan
Add crushed red pepper flakes to the marinara.
You can also add a small amount to the breadcrumb mixture.
Start conservatively.
It is easier to add heat later than to remove it.
Fresh Basil Chicken Parmesan
Add fresh basil after the chicken comes out of the oven.
Fresh herbs provide a bright aroma that works beautifully with tomato sauce and cheese.
Extra-Cheesy Chicken Parmesan
Use a little more mozzarella and Parmesan.
However, remember that more cheese also means more moisture and richness.
There is a point where extra cheese stops improving the dish.
Panko Chicken Parmesan
Replace some or all of the breadcrumbs with panko.
This creates a particularly crunchy crust.
If you prefer grilled chicken with a smoky barbecue flavor, try our Classic BBQ Chicken recipe.
How to Serve Chicken Parmesan Like a Restaurant
Presentation does not require complicated decoration.
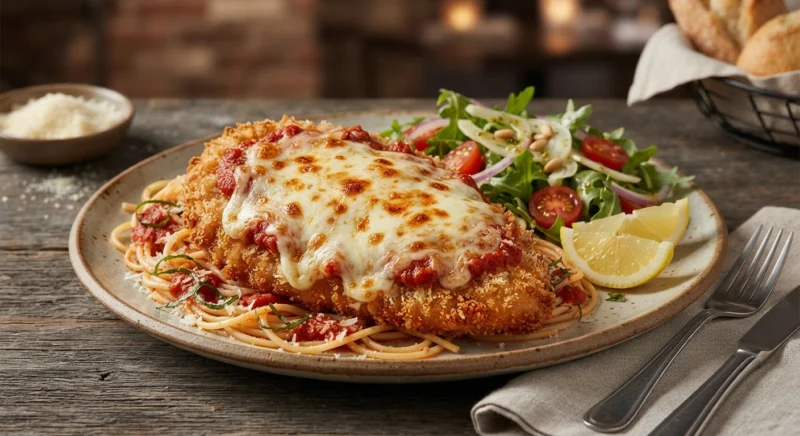
Place one Chicken Parmesan cutlet on each plate.
Add pasta alongside it rather than burying the chicken underneath a large pile of noodles.
Spoon a small amount of additional marinara beside or beneath the pasta.
Finish with a little Parmesan and fresh basil.
The chicken should remain the visual focus.
If you are using a dark plate or wooden serving board, the golden crust, red tomato sauce, and melted cheese provide a naturally attractive contrast.
When Should You Slice Chicken Parmesan?
For individual chicken cutlets, you can serve them whole.
If you want to show the inside, slice one cutlet diagonally before serving.
A sharp knife will make a cleaner cut through the crust.
Do not saw aggressively through the coating.
Use smooth controlled strokes.
The interior should be juicy and white, while the exterior remains golden and crisp.
The Complete Cooking Workflow
If you are making Chicken Parmesan for the first time, use this sequence.
Before cooking
- Preheat the oven.
- Prepare the chicken.
- Slice the breasts into cutlets.
- Flatten them evenly.
- Season the chicken.
- Prepare flour, egg, and breadcrumbs.
- Bread the chicken.
- Let the breaded chicken rest.
Cooking
- Heat the oil.
- Fry the cutlets in batches.
- Brown both sides.
- Check internal temperature.
- Drain on a wire rack.
Finishing
- Place the chicken on a baking sheet.
- Add a moderate amount of marinara.
- Add mozzarella.
- Add Parmesan.
- Bake until the cheese melts.
- Broil briefly if desired.
- Garnish and serve immediately.
This workflow keeps the process organized and prevents you from trying to prepare the sauce, breading, and frying all at the same time.
Beginner’s Visual Guide
Before frying, your breaded chicken should look evenly coated.
The surface should not have large bare patches.
When it enters the oil, you should see steady bubbling around the edges.
After the first turn, the cooked surface should be golden brown.
After frying, the crust should feel firm rather than soft.
After adding sauce and cheese, the chicken should still have visible areas of crust around the edges.
After baking, the cheese should be melted and lightly browned.
When cut open, the chicken should be juicy and fully cooked.
If all of these things happen, you are on the right track.
Frequently Asked Questions
Can I use chicken thighs?
Yes.
Boneless, skinless chicken thighs can produce a very flavorful Chicken Parmesan.
They have more fat than breast meat and therefore remain naturally juicy.
However, their shape can be less uniform, so you may need to flatten them more carefully.
Can I use store-bought marinara?
Absolutely.
A good prepared marinara saves time and works very well.
Choose one that tastes balanced rather than excessively sweet.
Do I have to fry the chicken?
No.
You can bake or air-fry the breaded chicken.
However, shallow frying generally produces the most traditional crisp crust.
Can I use fresh mozzarella?
Yes.
Fresh mozzarella tastes excellent, but it contains more moisture.
If using it, drain it thoroughly and pat it dry before adding it to the chicken.
Can I use only Parmesan without mozzarella?
Yes, but the result will be different.
Mozzarella provides the creamy melted cheese layer associated with classic Chicken Parmesan.
Parmesan alone gives you a stronger savory flavor and a more browned, firm topping.
Why does my chicken breading taste bland?
You may have seasoned only the breadcrumbs.
Season the chicken itself as well.
Layered seasoning creates much better flavor.
Why is my crust falling off?
The chicken may have been too wet, the flour may have been uneven, the egg layer may have been insufficient, or the breadcrumbs may not have been pressed firmly onto the chicken.
Resting the breaded chicken before frying can also help.
Can I make Chicken Parmesan without Parmesan cheese?
Technically yes, but Parmesan is an important part of the classic flavor.
If necessary, you can make a mozzarella-topped breaded chicken dish without it, but it will not have quite the same savory character.
Can I prepare the chicken the night before?
You can prepare and bread the chicken in advance and keep it refrigerated.
For the best texture, however, fry and finish it relatively close to serving.
How long should I bake Chicken Parmesan?
Because the chicken is already fried and cooked, the final baking stage usually only needs enough time to heat the sauce and melt the cheese.
Approximately 8–12 minutes at 400°F (200°C) is a useful starting point.
Use appearance rather than time alone.
Can I serve Chicken Parmesan with vegetables instead of pasta?
Definitely.
Roasted broccoli, zucchini, asparagus, green beans, or a simple salad all work well.
The dish is already rich, so fresh or lightly seasoned vegetables provide useful contrast.
Final Tips for Perfect Classic Chicken Parmesan
If you remember only a few things from this recipe, remember these:
1. Cut the chicken evenly.
Thin, uniform cutlets are the foundation of the dish.
2. Season the chicken itself.
Do not depend entirely on the sauce and breading for flavor.
3. Follow the flour → egg → breadcrumbs order.
Each stage has a purpose.
4. Press the breadcrumbs onto the chicken.
This improves adhesion.
5. Let the breaded chicken rest before frying.
A few minutes can make the coating more secure.
6. Keep the oil hot but controlled.
You want active sizzling, not smoking oil.
7. Do not overcrowd the skillet.
Fry in batches when necessary.
8. Use a thermometer.
Chicken should reach 165°F (74°C).
9. Drain fried cutlets on a wire rack.
This helps preserve the crust.
10. Do not drown the chicken in sauce.
A moderate layer gives you tomato flavor without completely destroying the crust.
11. Keep the final baking stage short.
The chicken is already cooked.
12. Serve immediately.
Chicken Parmesan is at its best when the cheese is hot and the contrast between crisp coating, tender chicken, tomato sauce, and melted cheese is still at its peak.
For more dependable, step-by-step dishes, explore our Best Chicken Recipes collection.
Classic Chicken Parmesan Recipe Card
Classic Chicken Parmesan
Prep Time: 25 minutes
Cook Time: 25 minutes
Resting Time: 5–10 minutes
Total Time: Approximately 55–60 minutes
Servings: 4
Yield: 4 Chicken Parmesan cutlets
Category: Main Course
Cuisine: Italian-American
Difficulty: Moderate
Ingredients
Chicken
- 2 large boneless, skinless chicken breasts
- 1 teaspoon kosher salt
- ½ teaspoon black pepper
- ½ teaspoon garlic powder
- ½ teaspoon paprika
Breading
- 1 cup all-purpose flour
- 2 large eggs
- 2 tablespoons milk or water
- 1½ cups plain breadcrumbs
- ½ cup finely grated Parmesan
- 1 teaspoon Italian seasoning
- ½ teaspoon garlic powder
- ½ teaspoon paprika
- ½ teaspoon kosher salt
- ¼ teaspoon black pepper
Frying
- Neutral cooking oil, enough for a ⅛- to ¼-inch layer
Topping
- 2 cups marinara sauce
- 1½ cups shredded low-moisture mozzarella
- ½ cup grated Parmesan
Optional Garnish
- Fresh basil
- Fresh parsley
Instructions
- Prepare the chicken. Pat the chicken breasts dry and remove any excess fat or connective tissue.
- Slice into cutlets. Carefully slice each chicken breast horizontally into thinner pieces.
- Flatten the chicken. Place the cutlets between parchment or plastic wrap and gently pound the thicker areas until approximately ¼–½ inch thick.
- Season. Combine the salt, pepper, garlic powder, and paprika. Season both sides of the chicken.
- Prepare the breading station. Place flour in one shallow dish. Whisk eggs with milk or water in a second. Combine breadcrumbs, Parmesan, Italian seasoning, garlic powder, paprika, salt, and pepper in a third.
- Bread the chicken. Coat each cutlet in flour, shake off excess, dip into egg, then coat thoroughly with the breadcrumb mixture. Press the breadcrumbs gently onto the chicken.
- Rest. Let the breaded chicken rest for 5–10 minutes.
- Heat the oil. Add enough neutral oil to a large skillet to create a shallow layer. Heat to approximately 350–375°F (175–190°C).
- Fry. Fry the cutlets in batches without overcrowding the pan. Cook approximately 2–4 minutes per side, until golden brown and crisp.
- Check temperature. The thickest part of the chicken should reach 165°F (74°C).
- Drain. Transfer the fried chicken to a wire rack.
- Add sauce and cheese. Place the cutlets on a baking sheet or baking dish. Spoon a moderate amount of marinara over each cutlet. Top with mozzarella and Parmesan.
- Bake. Bake at 400°F (200°C) for approximately 8–12 minutes, until the cheese is melted and bubbling.
- Brown the cheese. If desired, broil for 1–2 minutes until lightly browned. Watch carefully.
- Serve. Garnish with fresh basil or parsley and serve immediately with pasta, salad, or vegetables.
Recipe Notes
For the crispiest Chicken Parmesan, keep the cutlets thin and even, maintain the oil temperature during frying, avoid overcrowding the skillet, and drain the fried chicken on a wire rack. Use only enough marinara to cover the center of each cutlet without completely soaking the crust.
For food safety, always check that the chicken reaches an internal temperature of 165°F (74°C).